
This KB article shows you how you can sign your SSL/TLS certificates with a Microsoft Certificate Authority (CA). This article compliments our product specific documentation for configuring SSL/TLS.
Why would you want to do this? When you create self-signed certificates they are not trusted by your web browser and produce warning messages. When a Windows computer is a member of an Active Directory (AD) domain, Internet Explorer will trust certificates signed by the CA(s) in that domain and hence will not produce warnings.
Requirements
This KB article assumes that you have been following the product specific documentation for configuring SSL/TLS an requires you to be in the root users home directory. If you are not in this directory execute the following command:
cd ~
Get Certificate Request
In the product specific documentation for configuring SSL/TLS you would have executed the following command:
openssl req -new -key keyfile.key -out certrequest.csr
You will have completed all of the fields and this will create the certrequest.csr file. Execute this command to display the contents of the request:
cat certrequest.csr
This will output something like this:
-----BEGIN CERTIFICATE REQUEST-----
MIICsDCCAZgCAQAwazELMAkGA1UEBhMCQVUxDDAKBgNVBAgMA05TVzEPMA0GA1UE
BwwGU3lkbmV5MRswGQYDVQQKDBJNeSBDb21wYW55IFB0eSBMdGQxIDAeBgNVBAMM
F3hpLXI2eC14ODYuYm94MjkzLmxvY2FsMIIBIjANBgkqhkiG9w0BAQEFAAOCAQ8A
MIIBCgKCAQEAymjrmOn5tea18eSBGbY07hPMybkwdMTrwq1DsrKBzQg+RrEjAmmN
s5ZvIsvFF1gVSXlIAASFFFG5M1UU2177bufNR/1D/6h4zwaVVz+8AzuuLy8oaD3r
WKSnLkT/td1XrBEKb5MUtP8KjxUjC8g/zpRimAzrIgIzzW913uLXkaf6DY9QluOJ
9ifNtWhE/7OYas08vykwYscZjWEGcxt14qYdh7X4BtOjXFMSrrHyCNgv8+TYJDnP
QIcj1uRIrQTn+qH3U4nDWrym4Leu96vyHc0uO/kx+xtLb6svnYZganyAjmipa7cn
CFdVeC1EewSSTSlUSGdecEYUeaRKLhc6XwIDAQABoAAwDQYJKoZIhvcNAQEFBQAD
ggEBAHIaS52B88Iszn75iUOsZQJvT74z/q6xiNQNiEMxzjgdMLoDumswHopFEoPd
fB0UQT6l4YZo1boqw+yLNA7YizWt9vBJI6a3y1+Bi16mjdbdDBNqMuPkZjPtjqkh
AzNiSEWQL9LpOgmxDq33UKNi6kocffnUqIle28hTjWV6LNNy4gdmiYFrQAbAAIiJ
ubRbiEcrslEIaCTJgt3ucYDOtQvhlviSmk1j5xS0daGRAfntwyRe+0ZhLoRIykHk
cN/7NNzv5bSpGN8Lxe8HOspAaojg6t9JiFPsa8cOOW3Xj6CmiffG6Fwr5vySyTEv
HlprRyDQ1VV3LXZT9XeBJ+gAXJE=
-----END CERTIFICATE REQUEST-----
The following step will require you to provide this request.
Sign Using Web Interface
The Microsoft CA has a web interface available to use for signing certificate requests. This can be accessed by navigating to the following address in your web browser:
http://ca_server_address/certsrv
You will need to provide valid credentials to access the website.
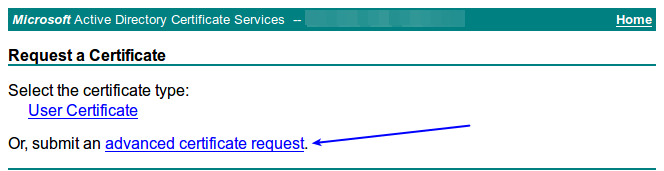
You will be presented with the Welcome page. Click the Request a certificate link.
Click the advanced certificate request link.
In the Saved Request field paste the certificate request, including the -----BEGIN CERTIFICATE REQUEST----- and -----END CERTIFICATE REQUEST----- lines.
In the Certificate Template drop down list select Web Server.
In the Additional Attributes field add your server name and FQDN as follows, being sure to replace 'servername' and 'servername.domain.ca' with your information:
SAN:DNS=servername&DNS=servername.domain.ca
Click the Submit button.

The certificate will be signed and issued. Select Base 64 encoded and then click the Download certificate link.
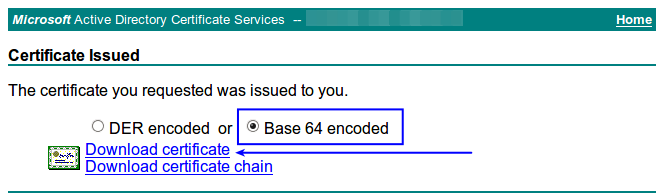
You web browser will prompt you to download a file called certnew.cer which you can save. You will need to open this file in a text editor such as Notepad and will appear something like:
-----BEGIN CERTIFICATE-----
MIIEszCCA5ugAwIBAgITbwAAAA/KbjzlBRf/EQAAAAAADzANBgkqhkiG9w0BAQsF
ADAeMRwwGgYDVQQDExNCT1gyOTMtV1NFLVdTRTAyLUNBMB4XDTE3MDYxNDAyMDEz
MloXDTE5MDYxNDAyMDEzMlowazELMAkGA1UEBhMCQVUxDDAKBgNVBAgTA05TVzEP
MA0GA1UEBxMGU3lkbmV5MRcwsdfsdQQKEw5Cb3gyOTMgUHR5IEx0ZDEkMCIGA1UE
AxMbeGktcjZ4LXg4Ni5ib3gyOTMtd3NlLmxvY2FsMIIBIjANBgkqhkiG9w0BAQEF
AAOCAQ8AMIIBCgKCAQEAymjrmOn5tea18eSBGbY07hPMybkwdMTrwq1DsrKBzQg+
RrEjAmmNs5ZvIsvFF1gVSXlIAASFFFG5M1UU2177bufNR/1D/6h4zwaVVz+8Azuu
Ly8oaD3rWKSnLkT/td1XrBEKb5MUtP8KjxUjC8g/zpRimAzrIgIzzW913uLXkaf6
DY9QluOJ9ifNtWhE/7OYas08vykwYscZjWEGcxt14qYdh7X4BtOjXFMSrrHyCNgv
8+TYJDnPQIcj1uRIrQTn+qH3U4nDWrym4Leu96vyHc0uO/kx+xtLb6svnYZganyA
jmipa7cnCFdVeC1EewSSaaaUSGdecEYUeaRKLhc6XwIDAQABo4IBmzCCAZcwHQYD
VR0OBBYEFNMHCBbBpPsVSM7fFv/FGJbB6+zFMB8GA1UdIwQYMBaAFM2vfjWYl4mA
xcc5obdaQUbEkOj5MEAGA1UddddQ5MDcwNaAzoDGGL2h0dHA6Ly9XU0UwMi9DZXJ0
RW5yb2xsL0JPWDI5My1XU0UtV1NFMDItQ0EuY3JsMIHKBggrBgEFBQcBAQSBvTCB
ujCBtwYIKwYBBQUHMAKGgagggGFwOi8vL0NOPUJPWDI5My1XU0UtV1NFMDItQ0Es
Q049QUlBLENOPVB1YmxpYyUyMEtleSUyMFNlcnZpY2VzLENOPVNlcnZpY2VzLENO
PUNvbmZpZ3VyYXRpb24sREM9Qk9YMjkzLVdTRSxEQz1sb2NhbD9jQUNlcnRpZmlj
YXRlP2Jhc2U/b2JqZWN0Q2xhc3M9Y2VydGlmaWNhdGlvbkF1dGhvcml0eTAhBgkr
BgEEAYI3FAIEFB4SAFcAZQBiAFMAZQByAHYAZQByMA4GA1UdDwEB/wQEAwIFoDAT
BgNVHSUEDDAKBggrBgEFBQcDATANBgkqhkiG9w0BAQsFAAOCAQEAqJdgvH30WjYA
eYcqqCKCK5MgjC69GCtV3uv/zFMjPWezJegJ+BaC6QzQmC+BP+c5QoHnaJTxeRkZ
qVy+FQKUMqssrOpTFcuoKX8IKTrg7YcXIhycZilT3k/zQySUhAy36QLzl8pU0uGa
DMBH+wqLg3r7M8p7oFYE/lzH6+xtFnqFo2juJTXICkeFuX9JwhhtjUIhMvXMXtU+
1PelhLQtgU0jo9CmDYOA4OcQaN9z48ZOLmc3oXAyxKLbkldeigzRqj+nv0lEAt6M
VqYke4frWLnZXNHy95AvwXEnV4ctJEw2a1hDFelrfcSKvXs+cJnMbawQ+/kAhjK6
TrMfb3j6sQ==
-----END CERTIFICATE-----
Saving or transferring this certificate to your Nagios server is covered in the Save Certificate On Nagios Server section of this KB article.
Sign Using certreq.exe
If you are unable to use the web interface to sign the certificate, you can use the certreq.exe program instead. Login to the Windows server that has the Certification Authority role installed.
The certrequest.csr file from the Nagios server will need to be transferred to this server, you will not be able to paste the request into a form. You can however simply paste the contents into a Notepad file and save it somewhere (the desktop perhaps) with the name of certrequest.csr.
Open a command prompt as an administrator and execute the following commands:
cd %HOMEPATH%\Desktop
certreq.exe -submit -attrib "CertificateTemplate: WebServer" certrequest.csr certfile.crt
This will prompt you which Certification Authority server you want to submit the request to. Select the appropriate one and click OK.

A certificate will be issues and saved to the desktop with the name certfile.crt. You will need to open this file in a text editor such as Notepad and will appear something like:
-----BEGIN CERTIFICATE-----
MIIEszCCA5ugAwIBAgITbwAAAA/KbjzlBRf/EQAAAAAADzANBgkqhkiG9w0BAQsF
ADAeMRwwGgYDVQQDExNCT1gyOTMtV1NFLVdTRTAyLUNBMB4XDTE3MDYxNDAyMDEz
MloXDTE5MDYxNDAyMDEzMlowazELMAkGA1UEBhMCQVUxDDAKBgNVBAgTA05TVzEP
MA0GA1UEBxMGU3lkbmV5MRcwsdfsdQQKEw5Cb3gyOTMgUHR5IEx0ZDEkMCIGA1UE
AxMbeGktcjZ4LXg4Ni5ib3gyOTMtd3NlLmxvY2FsMIIBIjANBgkqhkiG9w0BAQEF
AAOCAQ8AMIIBCgKCAQEAymjrmOn5tea18eSBGbY07hPMybkwdMTrwq1DsrKBzQg+
RrEjAmmNs5ZvIsvFF1gVSXlIAASFFFG5M1UU2177bufNR/1D/6h4zwaVVz+8Azuu
Ly8oaD3rWKSnLkT/td1XrBEKb5MUtP8KjxUjC8g/zpRimAzrIgIzzW913uLXkaf6
DY9QluOJ9ifNtWhE/7OYas08vykwYscZjWEGcxt14qYdh7X4BtOjXFMSrrHyCNgv
8+TYJDnPQIcj1uRIrQTn+qH3U4nDWrym4Leu96vyHc0uO/kx+xtLb6svnYZganyA
jmipa7cnCFdVeC1EewSSaaaUSGdecEYUeaRKLhc6XwIDAQABo4IBmzCCAZcwHQYD
VR0OBBYEFNMHCBbBpPsVSM7fFv/FGJbB6+zFMB8GA1UdIwQYMBaAFM2vfjWYl4mA
xcc5obdaQUbEkOj5MEAGA1UddddQ5MDcwNaAzoDGGL2h0dHA6Ly9XU0UwMi9DZXJ0
RW5yb2xsL0JPWDI5My1XU0UtV1NFMDItQ0EuY3JsMIHKBggrBgEFBQcBAQSBvTCB
ujCBtwYIKwYBBQUHMAKGgagggGFwOi8vL0NOPUJPWDI5My1XU0UtV1NFMDItQ0Es
Q049QUlBLENOPVB1YmxpYyUyMEtleSUyMFNlcnZpY2VzLENOPVNlcnZpY2VzLENO
PUNvbmZpZ3VyYXRpb24sREM9Qk9YMjkzLVdTRSxEQz1sb2NhbD9jQUNlcnRpZmlj
YXRlP2Jhc2U/b2JqZWN0Q2xhc3M9Y2VydGlmaWNhdGlvbkF1dGhvcml0eTAhBgkr
BgEEAYI3FAIEFB4SAFcAZQBiAFMAZQByAHYAZQByMA4GA1UdDwEB/wQEAwIFoDAT
BgNVHSUEDDAKBggrBgEFBQcDATANBgkqhkiG9w0BAQsFAAOCAQEAqJdgvH30WjYA
eYcqqCKCK5MgjC69GCtV3uv/zFMjPWezJegJ+BaC6QzQmC+BP+c5QoHnaJTxeRkZ
qVy+FQKUMqssrOpTFcuoKX8IKTrg7YcXIhycZilT3k/zQySUhAy36QLzl8pU0uGa
DMBH+wqLg3r7M8p7oFYE/lzH6+xtFnqFo2juJTXICkeFuX9JwhhtjUIhMvXMXtU+
1PelhLQtgU0jo9CmDYOA4OcQaN9z48ZOLmc3oXAyxKLbkldeigzRqj+nv0lEAt6M
VqYke4frWLnZXNHy95AvwXEnV4ctJEw2a1hDFelrfcSKvXs+cJnMbawQ+/kAhjK6
TrMfb3j6sQ==
-----END CERTIFICATE-----
Saving or transferring this certificate to your Nagios server is covered in the Save Certificate On Nagios Server section of this KB article.
Save Certificate On Nagios Server
The signed certificate needs to be saved to the Nagios server into the root users home directory with the filename of certfile.crt. Execute the following command on your Nagios server to create a new file on your Nagios server:
vi certfile.crt
When using the vi editor, to make changes press i on the keyboard first to enter insert mode. Press Esc to exit insert mode.
Paste the certificate text into the new file, including the -----BEGIN CERTIFICATE----- and -----END CERTIFICATE----- lines.
When you paste the certificate into vi, it's possible that blank lines are added between each line. You will need to remove these blank lines as they will cause the certificate file to break.
Save the changes in vi by typing:
:wq
and press Enter.
This completes the steps for signing a certificate with a Microsoft CA. You should now return to the product specific documentation for configuring SSL/TLS to complete the steps to implement this signed certificate.
If you run into validation issues, please see the article, SSL Certificate does not validate properly.
Final Thoughts
For any support related questions please visit the Nagios Support Forums at:
http://support.nagios.com/forum/
Article ID: 597
Created On: Wed, Jun 14, 2017 at 5:28 PM
Last Updated On: Tue, Jan 7, 2025 at 10:04 AM
Authored by: tlea
Online URL: https://support.nagios.com/kb/article/ssl-tls-signing-certificates-with-a-microsoft-certificate-authority-597.html