Network Switch and Router Wizard Overview
Nagios XI uses configuration wizards to configure commands and services for any kind of monitoring. The Switch and Router wizard is specifically designed for monitoring network devices and does this using SNMP (Simple Network Management Protocol). This document describes how the Switch/Router wizard is designed and the components that make it work, and includes troubleshooting information.
The Switch and Router Wizard is accessible in Nagios XI by navigating to Configure > Run The Monitoring Wizard > Network Switch / Router
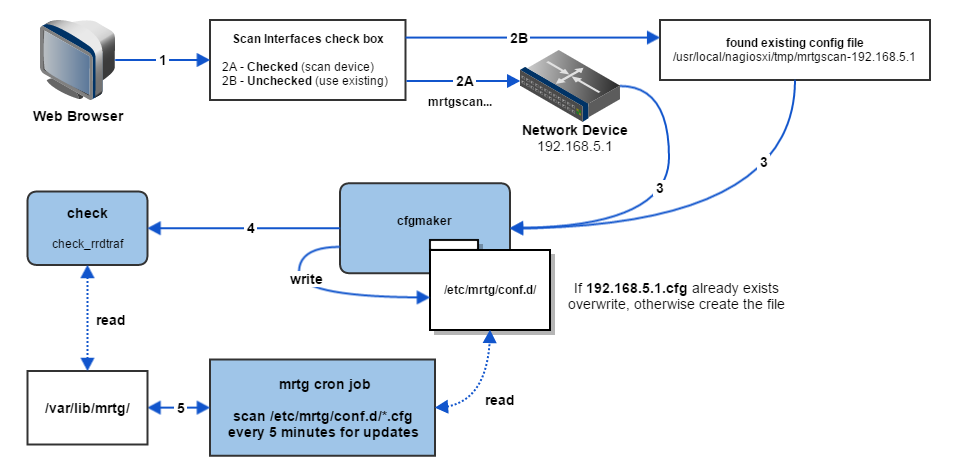
Here is the architectural overview of the Network Switch and Router Wizard on a router with the IP Address of 192.168.5.1:
Run through the Wizard Configuration section (below) setting the host and services that will be created for the target device.
mrtgscan
Scan Interfaces checked: Step 2A, Run mrtgscan against device.
Scan Interfaces not checked: Step 2B, Find existing mrtgscan-192.168.5.1 file in /usr/local/nagiosxi/tmp/, skip to step 4.
Send mrtgscan-192.168.5.1 to cfgmaker
Write mrtgscan information from above file to /etc/mrtg/conf.d/192.168.5.1.cfg if it doesn't already exist (otherwise overwrite).
Create Check that will run check_rrdtraf.
Check is created by cfgmaker and will continuously read /var/lib/mrtg/ for any matching .rrd configuration definitions.
MRTG cron job | Runs every 5 minutes.
Scan /etc/mrtg/conf.d/ for "*.cfg" files every 5 minutes.
Write all "*.cfg" files into the /var/lib/mrtg/ directory as .rrd files.
Check will send the performance data to Nagios XI.
When you access the monitoring wizard you will encounter a number of steps to setup the wizard. It will ask for the following information:
Set an IP Address of the device you want to monitor.
Set a Port for the network device.
Select the SNMPversion (SNMPv1, SNMPv2c or SNMPv3 - this will rely on your device configuration)
SNMPv1 and SNMPv2c will be identical during Step 2 setup:
SNMP Community: Here you must indicate a community string- 'public' by default.
Monitoring Options: Monitor Using will select between displaying Port Numbers or Name for the Port Naming scheme.
Scan Interfaces: If checked, mrtgscan will scan the device for interfaces which will create an mrtgscan-<Device IP Address> file for cfgmaker to read. If not checked it will use an existing mrtgscan-<Device IP Address> file to proceed with the wizard (as shown in the diagram at step 2)
Value Defaults: This will determine the default values for the interfaces that are found. You will be able to change these in the next step, but can save time if you are dealing with a large number of interfaces:
Warning and Critical Input Rate, Warning and Critical Output Rate: Set these to what you might have for limits in your environment. Default Warning is 50%, default Critical is 80%.
Default Port Speed: Set this if you know the speeds to expect otherwise leave as default and you can experiment when your data comes in.
SNMPv3 Step 2 setup:
SNMPv3 Authentication: SNMPv3 requires a lot more authentication to be done. Make sure you set this on your device prior to running this wizard:
noAuthNoPriv: Communication without authentication and privacy. You will not need an Authentication or Privileged password.
authNoPriv: Communication with authentication and without privacy. You will need an Authentication password, but not a Privileged password.
authPriv: Communication with authentication and privacy. You will need both an Authentication and a Privileged password.
Username: The username the device is going to allow the SNMP request for.
Authentication Password: Authenticate and sign the message being sent.
Privileged Password: The password that will be used to encrypt the data received from the request.
Authentication Protocol: Choose between MD5 and SHA encryption methods for your Authentication security.
Privileged Protocol: Choose between DES and AES encryption protocol for the Privileged Password. It should be noted that this wizard currently only supports AES-128. Due to the lack of support for AES-192 and AES-256 in the Net-SNMP package we cannot support the longer encryption methods at this time. (v2.1.6 - 01/07/2015)
Value Defaults and Monitoring Options will be the same as above for SNMPv1 and SNMPv2c.
Once you move to Step 3 the device interfaces are scanned and displayed. Now configure the following:
Select a hostname that you would like to have associated with this switch or router. This will make it easier to locate and differentiate between all of your hosts and services.
Select to use the Ping service or not. Will create a service that monitors the device with an ICMP ping to indicate general uptime.
Bandwidth and Port Status: after the devices have been detected a table will be built in this step. You can indicate the Service Description, Bandwidth (warning in/out rates, critical in/out rates. These were originally set by the default setting in the previous step.) and finally the Port Status check box which will be the physical service connected to the interface in the table.
To complete the wizard, on the the final step, Click the 'Finish' button and wait for the configuration to write. If everything completed successfully you will see the green check marks indicating the configuration was successful.
The core of the Switch and Router wizard is a Perl configuration creation program called MRTG. It uses Perl to parse and write out configuration files by accepting arguments and files that are passed to it.
Here are the important file locations that MRTG will use to create the monitoring configuration for Nagios XI:
mrtg.cfg file:
/etc/mrtg/mrtg.cfg
*mrtg device config folder- where cfgmaker writes to AND where the mrtg cron job will check for updates:
/etc/mrtg/conf.d/
mrtgscan files- this is where the wizard will find existing mrtgscan files:
/usr/local/nagiosxi/tmp/
Here is the file name formatting for both types of MRTG configuration files:
Device configuration format in ../conf.d/:
{address}.cfg
mrtgscan config format in ../nagiosxi/tmp/:
mrtgscan-{address}
When additions are made to the mrtg.cfg file by the Nagios XI Switch and Router Wizard then you will see this indicator. This is a good way to make sure the files are being written:
#### ADDED BY NAGIOSXI (USER: %s, DATE: %s) ####
This is the plugin that runs the Network Switch and Router wizard. It's use is described in the first few description lines:
# Check ifoperstatus() without calling the perl routine, this script uses
# snmpwalk to get the info.
check_ifoperstatnag was created from ifoperstatus and allows SNMPv3 permission variables that are needed by version 3. Then, retrieve the trap data we want using snmpwalk which is highly customizable. This will also account for administratively down interfaces before the snmpwalk is ran.
The command definition templates are simple and designed to accept the arguments from the wizard:
#########################################
## TEMPLATES
#########################################
define command{
 command_name check_xi_service_ifoperstatusnag
 command_line $USER1$/check_ifoperstatnag $ARG1$ $ARG2$ $HOSTADDRESS$
 }
define command{
 command_name check_xi_service_ifoperstatus
 command_line $USER1$/check_ifoperstatus -H $HOSTADDRESS$ -C $ARG1$ -k $ARG2$ $ARG3$
 }
You can see the command definition utilizing the check_ifoperstatnag plugin in the command definitions.
MRTG Issues
The most common issues with the Switch and Router wizard will involve MRTG dependencies, configuration and permissions. Check Perl Dependencies.
Trap/ MIB Definitions Missing
If you aren't able to parse or receive information about one of your network devices it could be because you do not have the proper MIB installed for the specific device. Many manufactures make MIBs for their devices so you will need to find them and discover which dependencies they require. Nagios XI has a large number of basic MIBs that are needed for basic devices including SNMPv1 and SNMPv2, but it is important to make sure that you install MIBs in order of dependency or the MIB definition will not be correctly written to the snmptt.conf page.
You can Manage MIB files for all of your devices by navigating to Admin > Manage MIBs (under System Extensions on the left side navigation tab).
Here you can find links to locate MIBs, Upload MIBs into your Nagios XI /usr/share/snmp/mibs/ directory, Process trap definitions for MIBs you upload and save/delete MIBs that are currently located in your /usr/share/snmp/mibs/ directory. (Note that when you use the Nagios XI user interface that the owner and group of the MIB files will be apache:apache because we are accessing them form the web interface. This won't matter unless you have another process, like snmptt for example, trying to read the MIB files themselves.)
Net-SNMP version 3 Options Introduction
For any support related questions please visit the Nagios Support Forums at:
http://support.nagios.com/forum/
Article ID: 62
Created On: Fri, Feb 6, 2015 at 1:38 PM
Last Updated On: Wed, Feb 19, 2020 at 3:00 PM
Authored by: lgroschen
Online URL: https://support.nagios.com/kb/article/nagios-xi-switch-and-router-wizard-architecture-62.html