This KB article explains how you can customize the network status map in Nagios Core. The aim of the article is to educate you on how you can open the map to specific layouts by customizing the URL in your web browser.
The modern status map was introduced in Nagios Core 4.1.0. If you are interested in using the legacy network status map please refer to the following KB article:
Nagios Core - Status Map Customization (Legacy)
Map Basic URL
The Nagios Core interface does not provide much customization in regards to the default views available when accessing the map. However the map itself is simply a URL that can be customized, so adding that URL as a favorite to your web browser provides this functionality.
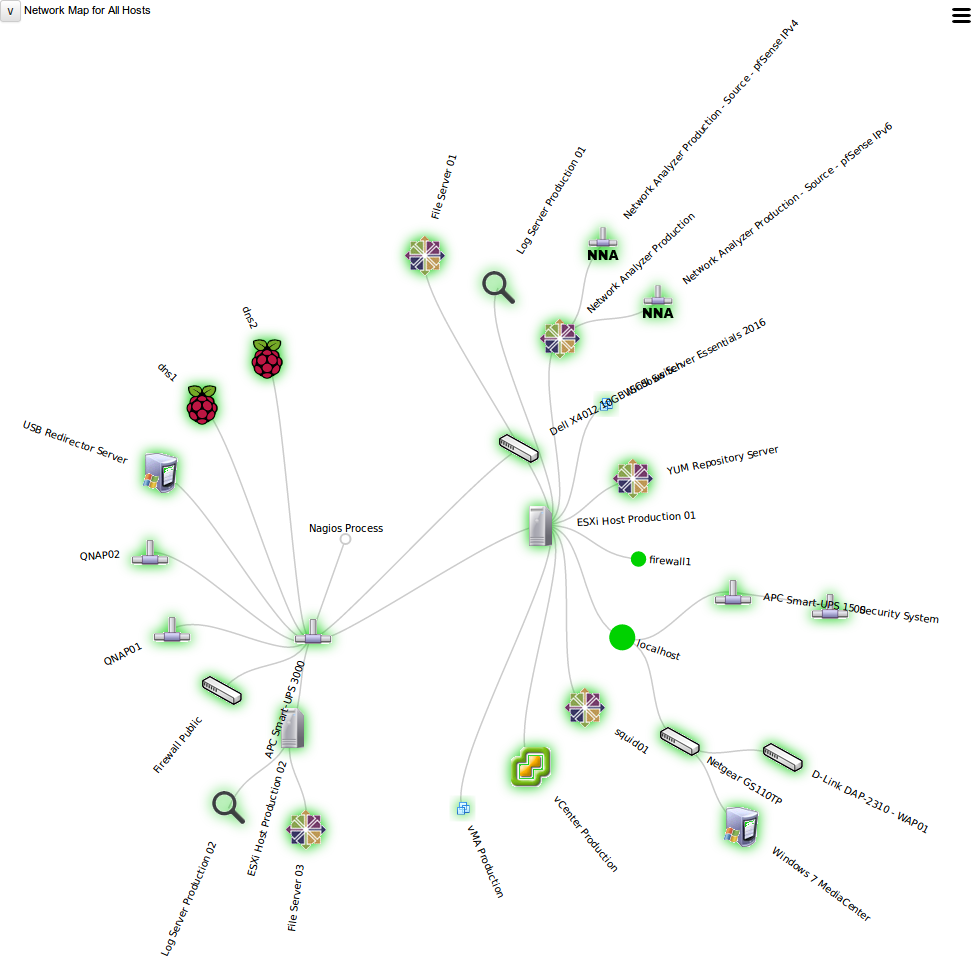
The first example is to show a default map and the corresponding URL. In your Nagios Core web interface, while holding CTRL on your keyboard click the Map link. This will open the map in a new browser window or tab. If this did not work right click on the Map link and select to open in a new window / tab. You will be presented with a map similar to the following:
In the web browser address bar have a look at the URL, it will be something like:
https://10.25.5.1/nagios/map.php?host=all
The map.php is how the legacy map is called.
The question mark (?) is how you pass arguments to the map. The default argument being passed is host=all which means all objects are shown. Any additional arguments are separated with an ampersand (&) and this is demonstrated in the Options section in this KB article.
With that in mind, let's change that to an object on the map, like host=firewall1 which will update the page as follows:

You can now see that the firewall1 object has a larger font.
Changing Map Settings
In the screenshots shown above you can see an icon in the top right corner three horizontal lines. Clicking this icon will display a modal of available options you can change.

After making any changes click the Apply button and the map will be refreshed, however these changes are not permanent and are also not reflected in the URL (which is what this KB article aims to educate you on).
If the previous map screenshots are different to your status map then you will be using a different map layout. The previous screenshots use the Circular (Balloon) layout.
You can change the layout using the options icon however this change is not permanent.
You can define the default map layout in the /usr/local/nagios/etc/cgi.cfg file. Here is an example:
default_statusmap_layout=6
| Value | Layout Method |
| 0 | User Supplied |
| 1 | Depth Layers (Horizontal) |
| 2 | Collapsed Tree (Horizontal) |
| 3 | Balanced Tree (Horizontal) |
| 4 | DO NOT USE |
| 5 | Circular Markup |
| 6 | Circular Balloon |
| 7 | Balanced Tree (Vertical) |
| 8 | Collapsed Tree (Vertical) |
| 9 | Depth Layers (Vertical) |
| 10 | Force Map |
You can also define a layout in your custom URL, this is performed by providing an argument like layout=5 in the URL. When providing multiple arguments they are separated with an ampersand (&), so building on the previous URL it would be typed as:
https://10.25.5.1/nagios/map.php?host=firewall1&layout=5
This would show a map similar to the following:

The User Supplied layout requires a combination of options, please see the Options - Layout section in this KB article.
Now that you have an understanding of how you can build a custom URL, the remaining options available are explained below. Multiple options are separated with an ampersand (&).
This allows you increase the size of the font of a specific host on the map.
https://10.25.5.1/nagios/map.php?host=firewall1
This allows you to define the layout you want to use for the map. All options available are explained in the Map Layout section of this KB article.
https://10.25.5.1/nagios/map.php?layout=5
The User Supplied layout requires a combination of options, please see the Options - Layout section in this KB article.
Allows you to limit how much the map can be zoomed in and out using the mouse wheel.
https://10.25.5.1/nagios/map.php?maxzoom=5
Removes any icons that are defined in the host object definitions.
https://10.25.5.1/nagios/map.php?noicons
Removes any connecting lines between objects.
https://10.25.5.1/nagios/map.php?nolinks
Removes any pop-ups when hovering over objects with the mouse.
https://10.25.5.1/nagios/map.php?nopopups
Removes the ability to resize the map using the triangle in the lower right corner of the map.
https://10.25.5.1/nagios/map.php?noresize
Removes text on the objects.
https://10.25.5.1/nagios/map.php?notext
This allows you to define the focus of the map.
https://10.25.5.1/nagios/map.php?root=firewall1
The User Supplied layout uses the 2d_coords directive that is defined in host object definitions. Only objects that posses the 2d_coords directive will be displayed correctly in this map layout.
The co-ordinates are based on an x,y axis where the upper left corner of the map is 0,0. The x axis travels in a positive direction to the right while the y axis travels in a positive direction downwards.
Objects without this directive will all appear in the 0,0 location on the map (all on top of each other).
More information on the 2d_coords directive can be found here:
Nagios Core - Object Definitions - Host Definitions
The User Supplied layout (0) requires a combination of options to correctly work depending on the Dimension option.
fixed respects the 2d_coords co-ordinates in the host object definitions.
https://10.25.5.1/nagios/map.php?layout=0&dimensions=fixed
auto takes the 2d_coords co-ordinates in the host object definitions and then scales the map relative to the size of the browser window.
https://10.25.5.1/nagios/map.php?layout=0&dimensions=auto
user allows you to define the size of the map and requires additional arguments:
ulx = upper left x co-ordinate
uly = upper left y co-ordinate
lrx = lower right x co-ordinate
lry = lower right y co-ordinate
Make sure the co-ordinates supplied are valid otherwise you'll end up with a blank map.
https://10.25.5.1/nagios/map.php?layout=0&dimensions=user&ulx=0&uly=0&lrx=1000&lry=700
Map Behavior
In the screenshots shown above you can see lines joining all of the objects. The is the parent relationship being reflected in the Nagios Core object definitions. For example the "APC Smart UPS 3000" is the parent host for "ESXi Host Production 01" which in turn is the parent host for a number of other hosts. Defining parent relationships in your object definitions helps visualize when problems occur and possibly pinpoint the source of the problem quickly.
Final Thoughts
For any support related questions please visit the Nagios Support Forums at:
http://support.nagios.com/forum/
Article ID: 725
Created On: Tue, Jul 25, 2017 at 2:08 AM
Last Updated On: Sun, Aug 27, 2017 at 10:00 PM
Authored by: tlea
Online URL: https://support.nagios.com/kb/article/nagios-core-status-map-customization-725.html