;)

;)
;)

;)
;)

;)
;)
;)
;)
;)
;)
;)

;)
;)
;)

;)
;)
;)

Translating and Converting MIB Files
Prerequisite MIBs
One of the most common issues that users encounter with SNMP Traps and MIB files are that most MIB files require other MIB files to be loaded on the system so they can be fully translated. Solving this issue require that those needed MIB files are gathered and translated appropriately.
The example in this article will be using the CISCO-SYSTEM-EXT-MIB to show what other MIB files it needs to translate OID's. The file begins with an Import section that will define the prerequisite MIBs.
IMPORTS
This section Include definitions from other MIBs here, which is at the top of the MIB file.
CISCO-SYSTEM-EXT-MIB DEFINITIONS ::= BEGIN
IMPORTS
MODULE-IDENTITY,
OBJECT-TYPE,
NOTIFICATION-TYPE,
Unsigned32,
Gauge32
FROM SNMPv2-SMI
MODULE-COMPLIANCE,
OBJECT-GROUP,
NOTIFICATION-GROUP
FROM SNMPv2-CONF
TEXTUAL-CONVENTION,
TruthValue,
DateAndTime
FROM SNMPv2-TC
SnmpAdminString
FROM SNMP-FRAMEWORK-MIB
InetAddressType,
InetAddress
FROM INET-ADDRESS-MIB
sysName
FROM SNMPv2-MIB
EntPhysicalIndexOrZero,
TimeIntervalSec
FROM CISCO-TC
ciscoMgmt
FROM CISCO-SMI;
In the above example, you will see the FROM keyword. The names presented after the FROM keyword are the names of the MIB files that the CISCO-SYSTEM-EXT-MIB needs.
Here are the names of the MIBs that are required for the example.
SNMPv2-SMI
SNMPv2-CONF
SNMPv2-TC
INET-ADDRESS-MIB
CISCO-TC
CISCO-SMI
Once these MIBs are obtained and added to the system, you can upload the CISCO-SYSTEM-EXT-MIB to the server and translate it to determine what OIDs that are in the file itself.
To upload a MIB file to be used for a SNMP Trap:
- Navigate to the Admin > Manage MIBs menu.
- Click on the Browse button and select the prerequisite MIB file. Make sure you check the Process traps box as this will add the OIDs in the file to the defined traps in the SNMP Trap Interface.

- Repeat the process for all of the prerequisite MIBs.
- When all of the files are added to the system, you can then process the CISCO-SYSTEM-EXT-MIB MIB. It will add 4 Traps to the system.
- Scroll down to see the MIB in the list.

To get a list of the OID's that are in the MIB file, you can open a root shell and run the example command.
snmpttconvertmib --in=/usr/share/snmp/mibs/CISCO-SYSTEM-EXT-MIB.txt --out=/root/test
This will convert the MIB file and output the translated traps to the /root/test file so you and view them.
MIB: CISCO-SYSTEM-EXT-MIB (file:/usr/share/snmp/mibs/CISCO-SYSTEM-EXT-MIB.txt) converted on Sat Sep 26 11:03:48 2020 using snmpttconvertmib v1.3###EVENT cseHaRestartNotify .1.3.6.1.4.1.9.9.305.1.3.5.0.1 "Status Events" NormalFORMAT A service restart notification is generated $*SDESCA service restart notification is generatedwhenever a service (or a process) on the 'active'supervisor is restarted.Variables: 1: cseHaRestartReason 2: cseHaRestartService 3: cseHaRestartStatelessEDESC###EVENT cseShutDownNotify .1.3.6.1.4.1.9.9.305.1.3.5.0.2 "Status Events" NormalFORMAT A system shutdown notification is generated $*SDESCA system shutdown notification is generatedwhenever a system is going to shut down. ThecseHaShutDownReason, describes the reason as towhy the system is going to go down.Variables: 1: cseHaShutDownReasonEDESC###EVENT cseFailSwCoreNotify .1.3.6.1.4.1.9.9.305.1.4.3.0.1 "Status Events" NormalFORMAT A notification is generated whenever a software $*SDESCA notification is generated whenever a softwarecrash occurs and a core file is generated.Variables:EDESC###EVENT cseFailSwCoreNotifyExtended .1.3.6.1.4.1.9.9.305.1.4.3.0.2 "Status Events" NormalFORMAT A notification is generated whenever a software $*SDESCA notification is generated whenever a softwarecrash occurs and a core file is generated.Variables: 1: sysName 2: cseSwCoresFileName 3: cseSwCorePath 4: cseSwCoresPIDEDESC
For more details on the snmpttconvertmib command, see this link:
http://snmptt.sourceforge.net/docs/snmpttconvertmib.shtml
SNMPTRANSLATE Command
A similar command is the snmptranslate command. The snmptranslate tool is a very powerful tool that allows you to browse the MIB tree in various ways from the command line. You can use it to translate OID numbers to the names, and to translate the names to the OID numbers.
http://net-snmp.sourceforge.net/tutorial/tutorial-5/commands/snmptranslate.html
https://linux.die.net/man/1/snmptranslate
For example, if you want to know the OID number for the cseFailSwCoreNotifyExtended trap, you would run the following.
snmptranslate -On CISCO-SYSTEM-EXT-MIB::cseFailSwCoreNotifyExtended
.1.3.6.1.4.1.9.9.305.1.4.3.0.2
If you want to get a full list of the OIDs and the names that are in a MIB file, you would run the following.
snmptranslate -Tz -m /usr/share/snmp/mibs/CISCO-SYSTEM-EXT-MIB.txt
Here is a short list of the output.
"ciscoDomains" "1.3.6.1.4.1.9.19""ciscoTDomains" "1.3.6.1.4.1.9.19.99999""ciscoTDomainUdpIpv4" "1.3.6.1.4.1.9.19.99999.1""ciscoTDomainUdpIpv6" "1.3.6.1.4.1.9.19.99999.2""ciscoTDomainTcpIpv4" "1.3.6.1.4.1.9.19.99999.3""ciscoTDomainTcpIpv6" "1.3.6.1.4.1.9.19.99999.4""ciscoTDomainLocal" "1.3.6.1.4.1.9.19.99999.5""ciscoTDomainClns" "1.3.6.1.4.1.9.19.99999.6""ciscoTDomainCons" "1.3.6.1.4.1.9.19.99999.7""ciscoTDomainDdp" "1.3.6.1.4.1.9.19.99999.8""ciscoTDomainIpx" "1.3.6.1.4.1.9.19.99999.9""ciscoTDomainSctpIpv4" "1.3.6.1.4.1.9.19.99999.10""ciscoTDomainSctpIpv6" "1.3.6.1.4.1.9.19.99999.11"
Example
Let's say you want to check a linux system's uptime.
The uptime OID is in the SNMPv2-MIB Mib file and to find the OID, you would run this command.
snmptranslate -Tz -m /usr/share/snmp/mibs/SNMPv2-MIB.txt |grep -i time
The command will output the name of the OID and the number of the OID you would use.
"sysUpTime" "1.3.6.1.2.1.1.3"
One key aspect of MIBs is that only the types of objects on the managed device are specified by the MIB, and not the specific objects (or instances). When specifying an object to the SNMP agent, a proper Object ID which includes the instance is necessary. When not properly specified, the agent responds with a "No such variable" error.
In the examples below, you will see that the OID has a .0 added to the OID. The first instance of the sysUpTime OID is 0. If there were more and you want to check that instance, you would change the .0 to that instance.
For example, if you are polling a network switch for the interface status, each interface on the device will have it's own instance.
Port 1 would be instance .1
Port 2 would be instance .2
And so on.
Here are the example checks for the sysUpTime OID. You will see that the .0 was added to the OID. This example used the name of the OID. When using the name, you can specify the name of the MIB in the command so the check knows where to lookup the OID.
/usr/local/nagios/libexec/check_snmp -H centos7 -p 161 -o SNMPv2-MIB::sysUpTime.0 -P 2c -c public
The plugin's output:
SNMP OK - Timeticks: (53678) 0:08:56.78 | SNMPv2-MIB::sysUpTime.0=53678
This example only uses the OID number so the name of the MIB is not needed.
/usr/local/nagios/libexec/check_snmp -H centos7 -p 161 -o 1.3.6.1.2.1.1.3.0 -P 2c -c public
The plugin's output:
SNMP OK - Timeticks: (57748) 0:09:37.48 | iso.3.6.1.2.1.1.3.0=57748
By default, when a MIB is added to the XI server, all of the OIDs are setup with the Normal state, so if a good or bad trap is received with the same OID, it will always show up in XI with an OK state.
LinkDown Trap
Now, let’s take a look as the linkDown Trap in the SNMP Trap Interface menu.
- Navigate to Admin -> SNMP Trap Interface.
- Click on the Defined Traps Tab and search for the linkDown Trap and you will see the following:

- To edit the Trap, click on the Edit icon and you can view the Trap Settings.

The Trap is defined in the SNMPTT as the following and we will be using the ifOperStatus variable to create a Critical Trap.
EVENT linkDown .1.3.6.1.6.3.1.1.5.3 "Status Events" NormalFORMAT Received trap "$N" with variables "$+*"EXEC php /usr/local/nagiosxi/scripts/nxti.php --event_name="$N" --event_oid="$i" --numeric_oid="$o" --symbolic_oid="$O" --community="$C" --trap_hostname="$R" --trap_ip="$aR" --agent_hostname="$A" --agent_ip="$aA" --severity="$s" --uptime="$T" --datetime="$x $X" --unixtime="$@" --category="$c" --bindings="$+*"EXEC /usr/local/bin/snmptraphandling.py "$r" "SNMP Traps" "$s" "$@" "$-*" "A linkDown trap signifies that the SNMP entity, acting in $*"SDESCA linkDown trap signifies that the SNMP entity, acting in an agent role, has detected that the ifOperStatus object for one of its communication links is about to enter the down state from some other state (but not from the notPresent state). This other state is indicated by the included value of ifOperStatus.Variables: 1: ifIndex 2: ifAdminStatus 3: ifOperStatus EDESCTo create a Critical Trap, you will need to know how the variable ifOperStatus is defined and if you open the IF-MIB mib file, you see how this is defined. See below:
ifOperStatus OBJECT-TYPE
SYNTAX INTEGER {
up(1), -- ready to pass packets
down(2),
testing(3), -- in some test mode
unknown(4), -- status can not be determined
-- for some reason.
dormant(5),
notPresent(6), -- some component is missing
lowerLayerDown(7) -- down due to state of
-- lower-layer interface(s)
}
To get a Warning or Critical trap to show up in XI, you will have to edit the TRAP in the SNMP Trap Interface and use a MATCH command to get it to trigger with a Non-OK state. Until you add a MATCH statement to the file, all of the traps will come in as a normal status and will not generate a Warning or Critical.
- To edit the linkDown trap and change the Severity: Change the Severity field to Critical (or Warning) so when a link down trap comes in, it will generate a Non-OK state in XI.
- Then in the Additional Raw Data section, put in the following MATCH statement: MATCH $2: (down)i
How the MATCH is determined is that the left side of the : is the Variable that you want to MATCH with and the right side is the status of the trap.
If you look at the linkDown trap definition, you will see that the index for the ifOperStatus variable is a 3, but in the example, we used a $2. The reason this is done is that the MATCH index starts at 0 and not 1. Kind of confusing but just remember, subtract 1 from the variable.
The (down)i was selected to match against as that is what the ifOperStatus uses for the status of the interface when it is down.
The () around the word down is used as when a down trap is received, it is translated to the string "down" and the i at the end is to ignore case.
For more details on the MATCH statement, see the link below.
http://snmptt.sourceforge.net/docs/snmptt.shtml#SNMPTT.CONF-MATCH
- Here is what the trap definition will finally look like.

-
Save the trap by clicking on the Submit button.
To test it, you can run the following in a root shell.
snmptrap -v 2c -c public localhost '' linkDown ifDescr s eth0 ifAdminStatus i 0 ifOperStatus i 2
This will send a test trap to the SNMP Traps service for the localhost with the ifOperStatus status set to a 2 (down). This will generate a Critical State for the XI service.

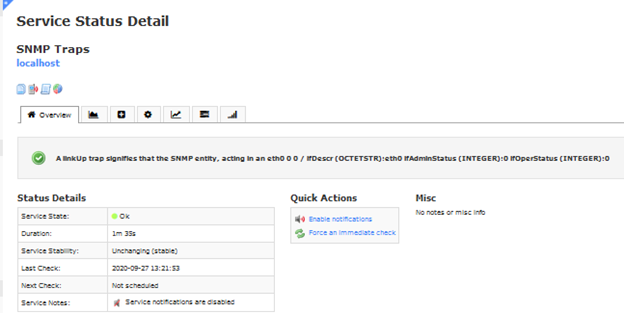
To clear the trap, a linkUp trap is used. Run this in a shell.
snmptrap -v 2c -c public localhost '' linkUp ifDescr s eth0 ifAdminStatus i 0 ifOperStatus i 0
Then the SNMP Traps service will clear to an OK state.