;)

;)
;)

;)
;)
;)

;)
;)
;)
;)
;)
;)
;)
;)
;)
;)
;)
;)
;)
;)
;)
;)
;)
;)
;)
;)
;)

;)
;)
;)
;)
;)
;)
;)
;)
;)
;)
;)
;)
;)
;)

Overview
This KB article will walk you through the steps of moving the /var/log directory to a new disk/volume in your server.
This is sometimes necessary to free up disk space on a volume that cannot have extra disk space easily added.
This guide was performed on a VM running Nagios XI 5.5.8, however it can be applied to any of the Nagios products as the steps are not specific to XI.
Here is a quick outline of what will be performed:
- View existing disks
- Configure OS for single user mode
- Add new disk to VM
- Prepare the new disk
- Move existing /var/log to new location
- Configure new disk to mount on boot
- Configure OS in multi user mode and reboot
- Final check
This guide requires multiple reboots of your server.
Please follow the steps for your specific operating system:
RHEL 7 + | CentOS 7 + | Oracle Linux 7 +
First establish an SSH session to your server as the user root.
View Existing Disks
Type:
ls /dev/sd*
This will show the existing disks:
/dev/sda /dev/sda1 /dev/sda2
Here you can see there is currently only sda (sda1 and sda2 are partitions on sda).
You also need to make sure the lvm2 programs are installed.
Type:
yum -y install lvm2
Wait while the program is downloaded and installed.
Configure OS For Rescue Mode
First we are going to configure the operating system in rescue mode.
This allows us to boot the OS with nothing running, this will prevent any issues from occurring while making these changes.
From this point on, your server will not perform any monitoring until we finish and put the server back in multi user mode.
Type:
systemctl set-default rescue.target
The following output will be shown:
Removed symlink /etc/systemd/system/default.target.
Created symlink from /etc/systemd/system/default.target to /usr/lib/systemd/system/rescue.target.
Add New Disk To VM
Now we are going to shutdown the VM.
Once you shutdown the VM, you will no longer have network connectivity to it (because we are in single user mode). Once you have powered on your VM, all commands will need to be done on the console of the VM.
Type:
shutdown -h now
Once the server has shutdown, using your Hypervisor, add the new disk to the VM. In this example I will be adding a 100GB disk.
Power on the VM and wait for it to boot up, once booted it will prompt you for the root password:

Prepare New Disk
Type:
ls /dev/sd*
This will now show the new /dev/sdb disk:
![]()
Now you will use fdisk to create a new partition:
fdisk /dev/sdb
The screenshot below shows the following commands you need to type:
Command: n
(primary partition): p
(partition number): 1
For the first and last cylinder accept the defaults by pressing Enter
Command: t
(hex code): 8e
Command: w

Now that the disk has been partitioned, the next step is to create the volume.
Type:
ls /dev/sd*
This will now show the new /dev/sdb1 partition:
![]()
The following steps will create a volume group (vg_log) and a logical volume (lv_log).
Type:
vgcreate vg_log /dev/sdb1
lvcreate -l 100%VG -n lv_log vg_log

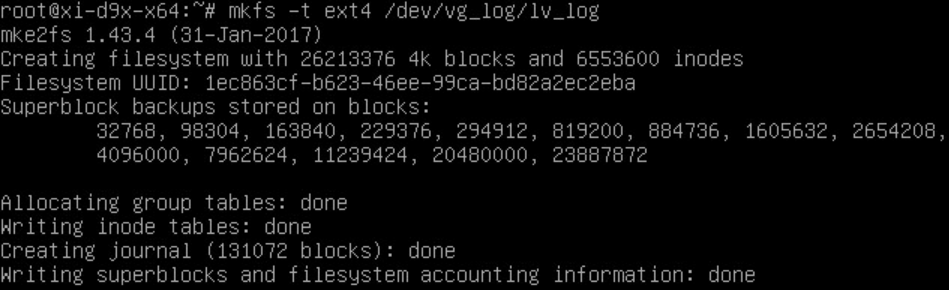
The following steps will define the volume with an ext4 filesystem.
Type:
mkfs -t ext4 /dev/vg_log/lv_log

Finally we'll temporarily mount the new volume so we can use it and check it has been mounted by listing the directory.
Type:
mkdir /mnt/tmp_vol
mount -t ext4 /dev/vg_log/lv_log /mnt/tmp_vol/
ls -la /mnt/tmp_vol/

Move Existing /var/log To New Location
Now we'll move the existing files in /var/log/ to the new volume.
Type:
mv /var/log/* /mnt/tmp_vol/
![]()
Depending on the amount of files will depend how long this takes. If everything goes well, there will be no errors output on the screen.
Once finished, check to see if there are any files remaining:
ls -l /var/log
![]()
Just to be sure, check the new volume for the files:
ls -l /mnt/tmp_vol
This should output a bunch of files and folders.
Configure New Disk To Mount On Boot
First we will un-mount the volume:
umount /mnt/tmp_vol
![]()
Next we add an entry to the /etc/fstab file to mount this volume to /var/log on bootup:
echo /dev/vg_log/lv_log /var/log ext4 defaults 0 0 >> /etc/fstab
![]()
Now reload the fstab file to mount the volume:
mount -a
![]()
Check the files and folders to see it mounted ok:
ls -l /var/log/
If you see the same files and folders as you did after moving the files everything is OK.
Configure OS For Multi User Mode And Reboot
Finally we are going to configure the operating system in multi user mode.
Type:
systemctl set-default multi-user.target
![]()
Now reboot:
reboot
Final Check
Once the server has rebooted, establish an SSH session to your server as the user root.
Type:
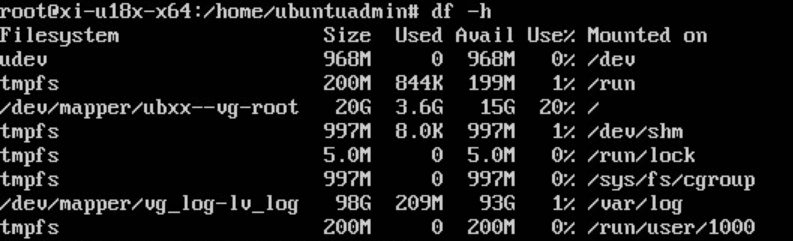
df -h
Here you'll see the disk has been mounted and is now /var/log with ample free space:

This completes moving /var/log to a new disk drive on RHEL 7 | CentOS 7 | Oracle Linux 7.
First establish an SSH session to your server as a user root.
View Existing Disks
Type:
ls /dev/sd*
This will show the existing disks:
/dev/sda /dev/sda1 /dev/sda2 /dev/sda5
Here you can see there is currently only sda (sda1, sda2 and sda5 are partitions on sda).
You also need to make sure the lvm2 programs are installed.
Type:
apt-get install -y lvm2
Wait while the program is downloaded and installed.
Configure OS For Rescue Mode
First we are going to configure the operating system in rescue mode.
This allows us to boot the OS with nothing running, this will prevent any issues from occurring while making these changes.
From this point on, your server will not perform any monitoring until we finish and put the server back in multi user mode.
Type:
systemctl set-default rescue.target
The following output will be shown:
Created symlink from /etc/systemd/system/default.target to /usr/lib/systemd/system/rescue.target.
Add New Disk To VM
Now we are going to shutdown the VM.
Once you shutdown the VM, you will no longer have network connectivity to it (because we are in single user mode). Once you have powered on your VM, all commands will need to be done on the console of the VM.
Type:
shutdown -h now
Once the server has shutdown, using your Hypervisor, add the new disk to the VM. In this example I will be adding a 100GB disk.
Power on the VM and wait for it to boot up, once booted it will prompt you for the root password:

Prepare New Disk
Type:
ls /dev/sd*
This will now show the new /dev/sdb disk:
![]()
Now you will use fdisk to create a new partition:
fdisk /dev/sdb
The screenshot below shows the following commands you need to type:
Command: n
(primary partition): p
(partition number): 1
For the first and last cylinder accept the defaults by pressing Enter
Command: t
(hex code): 8e
Command: w

Now that the disk has been partitioned, the next step is to create the volume.
Type:
ls /dev/sd*
This will now show the new /dev/sdb1 partition:

The following steps will create a volume group (vg_log) and a logical volume (lv_log).
Type:
vgcreate vg_log /dev/sdb1
lvcreate -l 100%VG -n lv_log vg_log

The following steps will define the volume with an ext4 filesystem.
Type:
mkfs -t ext4 /dev/vg_log/lv_log
Finally we'll temporarily mount the new volume so we can use it and check it has been mounted by listing the directory.
Type:
mkdir /mnt/tmp_vol
mount -t ext4 /dev/vg_log/lv_log /mnt/tmp_vol/
ls -la /mnt/tmp_vol/

Move Existing /var/log To New Location
Now we'll move the existing files in /var/log/ to the new volume.
Type:
mv /var/log/* /mnt/tmp_vol/
![]()
Depending on the amount of files will depend how long this takes. If everything goes well, there will be no errors output on the screen.
Once finished, check to see if there are any files remaining:
ls -l /var/log
![]()
Just to be sure, check the new volume for the files:
ls -l /mnt/tmp_vol
This should output a bunch of files and folders.
Configure New Disk To Mount On Boot
First we will un-mount the volume:
umount /mnt/tmp_vol
![]()
Next we add an entry to the /etc/fstab file to mount this volume to /var/log on bootup:
echo /dev/vg_log/lv_log /var/log ext4 defaults 0 0 >> /etc/fstab
![]()
Now reload the fstab file to mount the volume:
mount -a
![]()
Check the files and folders to see it mounted ok:
ls -l /var/log/
If you see the same files and folders as you did after moving the files everything is OK.
Configure OS For Multi User Mode And Reboot
Finally we are going to configure the operating system in multi user mode.
Type:
systemctl set-default multi-user.target

Now reboot:
reboot
Final Check
Once the server has rebooted, establish an SSH session to your server as the user root.
Type:
df -h
Here you'll see the disk has been mounted and is now /var/log with ample free space:

This completes moving /var/log to a new disk drive on Debian.
First establish an SSH session to your server as the user root.
View Existing Disks
Type:
ls /dev/sd*
This will show the existing disks:
/dev/sda /dev/sda1 /dev/sda2
Here you can see there is currently only sda (sda1 and sda2 are partitions on sda).
You also need to make sure the lvm2 programs are installed.
Type:
apt-get install -y lvm2
Wait while the program is downloaded and installed.
Configure OS For Single User Mode
First we are going to configure the operating system in single user mode.
This allows us to boot the OS with nothing running, this will prevent any issues from occurring while making these changes.
From this point on, your server will not perform any monitoring until we finish and put the server back in multi user mode.
Ubuntu 14
Type:
sed -i 's/DEFAULT_RUNLEVEL=2/DEFAULT_RUNLEVEL=1/g' /etc/init/rc-sysinit.conf
There will be no output from this command.
Ubuntu 16/18
Type:
systemctl set-default rescue.target
The following output will be shown:
Created symlink from /etc/systemd/system/default.target to /usr/lib/systemd/system/rescue.target.
Add New Disk To VM
Now we are going to shutdown the VM.
Once you shutdown the VM, you will no longer have network connectivity to it (because we are in single user mode). Once you have powered on your VM, all commands will need to be done on the console of the VM.
Type:
shutdown -h now
Once the server has shutdown, using your Hypervisor, add the new disk to the VM. In this example I will be adding a 100GB disk.
Power on the VM and wait for it to boot up, once booted it will look something like:
Ubuntu 14:

Ubuntu 16/18:

Prepare New Disk
Type:
ls /dev/sd*
This will now show the new /dev/sdb disk:
![]()
Now you will use fdisk to create a new partition:
fdisk /dev/sdb
The screenshot below shows the following commands you need to type:
Command: n
(primary partition): p
(partition number): 1
For the first and last cylinder accept the defaults by pressing Enter
Command: t
(hex code): 8e
Command: w

Now that the disk has been partitioned, the next step is to create the volume.
Type:
ls /dev/sd*
This will now show the new /dev/sdb1 partition:
![]()
The following steps will create a volume group (vg_log) and a logical volume (lv_log).
Type:
vgcreate vg_log /dev/sdb1
lvcreate -l 100%VG -n lv_log vg_log

The following steps will define the volume with an ext4 filesystem.
Type:
mkfs -t ext4 /dev/vg_log/lv_log

Finally we'll temporarily mount the new volume so we can use it and check it has been mounted by listing the directory.
Type:
mkdir /mnt/tmp_vol
mount -t ext4 /dev/vg_log/lv_log /mnt/tmp_vol/
ls -la /mnt/tmp_vol/

Move Existing /var/log To New Location
Now we'll move the existing files in /var/log/ to the new volume.
Type:
mv /var/log/* /mnt/tmp_vol/
![]()
Depending on the amount of files will depend how long this takes. If everything goes well, there will be no errors output on the screen.
Once finished, check to see if there are any files remaining:
ls -l /var/log
![]()
Just to be sure, check the new volume for the files:
ls -l /mnt/tmp_vol
This should output a bunch of files and folders.
Configure New Disk To Mount On Boot
First we will un-mount the volume:
umount /mnt/tmp_vol
![]()
Next we add an entry to the /etc/fstab file to mount this volume to /var/log on bootup:
echo /dev/vg_log/lv_log /var/log ext4 defaults 0 0 >> /etc/fstab
![]()
Now reload the fstab file to mount the volume:
mount -a
![]()
Check the files and folders to see it mounted ok:
ls -l /var/log/
If you see the same files and folders as you did after moving the files everything is OK.
Configure OS For Multi User Mode And Reboot
Finally we are going to configure the operating system in multi user mode.
Ubuntu 14
Type:
sed -i 's/DEFAULT_RUNLEVEL=1/DEFAULT_RUNLEVEL=2/g' /etc/init/rc-sysinit.conf
There will be no output from this command.
![]()
Ubuntu 16/18
Type:
systemctl set-default multi-user.target
The following output will be shown:
Removed symlink /etc/systemd/system/default.target.
Created symlink from /etc/systemd/system/default.target to /usr/lib/systemd/system/multi-user.target.

Now reboot:
reboot
Final Check
Once the server has rebooted, establish an SSH session to your server as the user root.
Type:
df -h
Here you'll see the disk has been mounted and is now /var/log with ample free space:
This completes moving /var/log to a new disk drive on Ubuntu.
Final Thoughts
This guide can easily be adapted to move any folder location to another disk.
For any support related questions please visit the Nagios Support Forums at:


