;)

;)
;)

;)
;)
;)

;)
;)
;)
;)
;)
;)
;)
;)
;)
;)
;)
;)
;)
;)
;)
;)
;)
;)
;)
;)
;)

;)
;)
;)
;)
;)
;)
;)
;)
;)
;)
;)
;)
;)
;)

Overview
This KB article shows you how to configure your Nagios server with a static IP address.
This KB article applies to RHEL, CentOS and Oracle Linux, as well as Ubuntu and Debian.
This applies to Nagios Fusion, Nagios Log Server, Nagios Network Analyzer and Nagios XI. There is also a dedicated section for each individual product that explains any specific changes that are required.
You will need to perform these changes while logged in as the root user or sudo into root.
Due to the nature of these changes it is recommended that you perform the actions while logged onto the console of the server, performing the changes from an SSH session may disconnect you from the server.
RHEL 7 | CentOS 7 | Oracle Linux 7
These steps are for RHEL 7 | CentOS 7 | Oracle Linux 7. If you are unsure what version of RHEL / CentOS your VM is running on you can execute the following command:
cat /etc/centos-release
Version 7 will output something like:
CentOS Linux release 7.4.1708 (Core)
If you have version 6 please go to the RHEL 6 | CentOS 6 | Oracle Linux 6 section.
Using nmtui
There's an easy way to perform these changes using nmtui (a text based GUI).
In your console session execute the command:
nmtui
If you receive the following error:
-bash: nmtui: command not found
Then you have two options:
Option 1)
Install the package using yum (which assumes your server has internet access via it's DHCP address):
yum install -y net-tools
Once installed execute the command again and proceed with the next step.
Option 2)
Manually configure address in config file. Please follow the steps in the "Manual IP Configuration" section that explains how to do this.
When you execute nmtui you will be prompted with a text based GUI:

Press Enter on Edit a connection
You will presented with a list of devices:
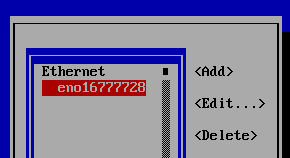
In this example eno16777728 is the default interface selected, press Enter
You will now be presented with the "Edit Connection" screen.
Press Tab on your keyboard until you are on <Automatic> selector next to IPv4 CONFIGURATION
Press Enter, select Manual from the list and press Enter
Press Tab until you are on <Show> (for IPv4) and press Enter
More fields will be shown on the screen
Press Tab until you are on <Add> selector next to Addresses
Type a valid address with using CIDR notation, for example 10.25.40.70/16
Repeat these steps for the Gateway IP and DNS Servers fields
If you want to define a static IPv6 address, follow the same steps above for the IPv6 CONFIGURATION section.
The following screenshot is an example configuration:
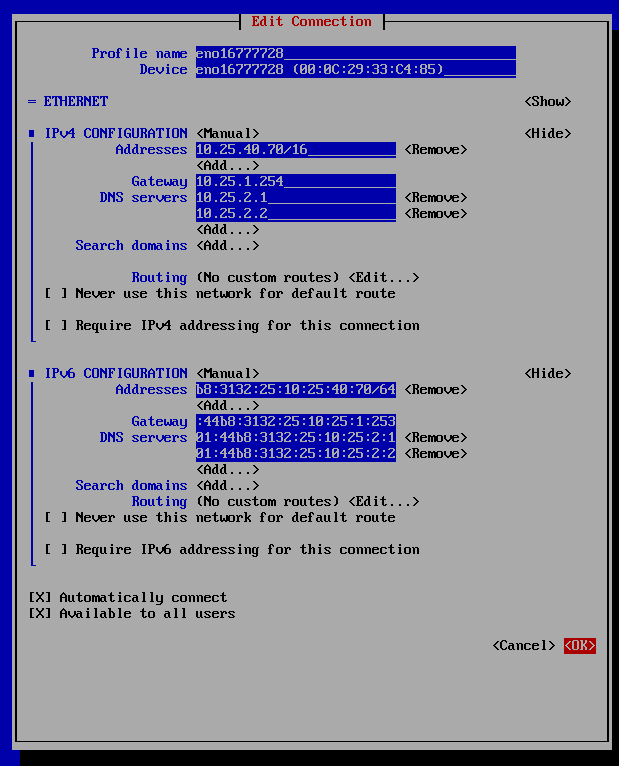
Press Tab until the OK button is selected press Enter to save the changes
You will be returned to the "Select A Device" screen.
Press Tab until the Quit button is highlighted and then press Enter
Now you will need to take the interface "down" and then back "up" again using the following commands:
ifdown eno16777728
ifup eno16777728
Execute these commands to check your changes have been applied and that they are working:
ip addr
ping -c 4 www.nagios.com
The output will be something like:
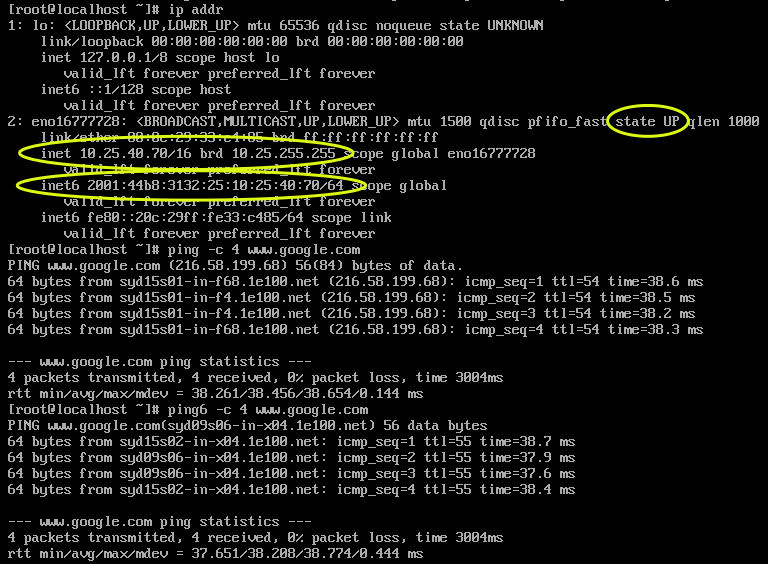
The important items in the output should be that the interface is in an UP state AND the inet address is correct (and inet6 if defined).
Manual IP Configuration
If you are unable to use nmuti (a text based GUI) to configure your IP address then you will need to configure the interface in the text based configuration file for that interface.
First you will need to identify the name of the network interface, type the following command:
ip addr
The output will be something like:
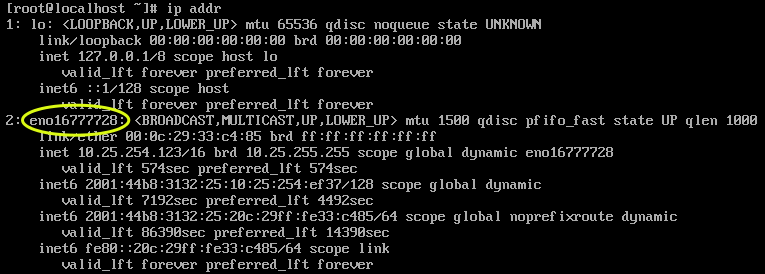
Here you can see the name of the interface is eno16777728
The config file for this interface will be in the file /etc/sysconfig/network-scripts/ifcfg-eno16777728
Open the vi editor using this command:
vi /etc/sysconfig/network-scripts/ifcfg-eno16777728
When using the vi editor, to make changes press i on the keyboard first to enter insert mode. Press Esc to exit insert mode.
The default configuration will appear something like:
TYPE=Ethernet
BOOTPROTO=dhcp
DEFROUTE=yes
IPV4_FAILURE_FATAL=no
IPV6INIT=yes
IPV6_AUTOCONF=yes
IPV6_DEFROUTE=yes
IPV6_FAILURE_FATAL=no
NAME=eno16777728
UUID=3de92714-441c-48cd-96bb-6a5a9c8aa91e
DEVICE=eno16777728
ONBOOT=yes
PEERDNS=yes
PEERROUTES=yes
IPV6_PEERDNS=yes
IPV6_PEERROUTES=yes
IPV6_PRIVACY=no
The following lines need changing in the file:
IPv4
BOOTPROTO=dhcp
To:
BOOTPROTO=none
IPv6
IPV6_AUTOCONF=yes
To:
IPV6_AUTOCONF=no
The following lines need removing from the file:
IPv4
PEERDNS=yes
PEERROUTES=yes
IPv6
IPV6_PEERDNS=yes
IPV6_PEERROUTES=yes
The following lines need to be added to the file (you will need to adjust them to your requirements):
IPv4
IPADDR=10.25.40.70
PREFIX=16
GATEWAY=10.25.1.254
DNS1=10.25.2.1
DNS2=10.25.2.2
IPv6
IPV6ADDR=2001:44b8:3132:25:10:25:40:70/64
IPV6_DEFAULTGW=2001:44b8:3132:25:10:25:1:253
DNS3=2001:44b8:3132:25:10:25:2:1
DNS4=2001:44b8:3132:25:10:25:2:2
The final configuration would look like this:
TYPE=Ethernet
BOOTPROTO=none
DEFROUTE=yes
IPV4_FAILURE_FATAL=no
IPV6INIT=yes
IPV6_AUTOCONF=no
IPV6_DEFROUTE=yes
IPV6_FAILURE_FATAL=no
NAME=eno16777728
UUID=3de92714-441c-48cd-96bb-6a5a9c8aa91e
DEVICE=eno16777728
ONBOOT=yes
IPV6_PRIVACY=no
IPADDR=10.25.40.70
PREFIX=16
GATEWAY=10.25.1.254
DNS1=10.25.2.1
DNS2=10.25.2.2
IPV6ADDR=2001:44b8:3132:25:10:25:40:70/64
IPV6_DEFAULTGW=2001:44b8:3132:25:10:25:1:253
DNS3=2001:44b8:3132:25:10:25:2:1
DNS4=2001:44b8:3132:25:10:25:2:2
Save the changes in vi by typing :wq and pressing Enter.
Now you will need to take the interface "down" and then back "up" again using the following commands:
ifdown eno16777728
ifup eno16777728
Execute these commands to check your changes have been applied and that they are working:
ip addr
ping -c 4 www.nagios.com
ping6 -c 4 www.nagios.com
The output will be something like:
RHEL 8 | CentOS 8 | Oracle Linux 8
Please see the following online references:
Debian
Please see the following online references:
Ubuntu
Please see the following online references:
Nagios Fusion Specific Settings
After changing the IP address on your server you should check that the Program URL is correct.
Admin > System Config > Manage System Config
General Program Settings
Make sure the Program URL is correct.
If a DNS entry is used make sure that this resolves to your new IP address.
Nagios Log Server Specific Settings
After changing the IP address on your server you should check that the Interface URL is correct.
Administration > General > Global Settings
Make sure the Interface URL is correct.
If a DNS entry is used make sure that this resolves to your new IP address.
In addition to this, on ALL nodes you need to check the following file has the correct IP addresses:
/usr/local/nagioslogserver/var/cluster_hosts
Nagios Network Analyzer Specific Settings
There are no additional changes required.
Nagios XI Specific Settings
After changing the IP address on your server you should check that the Program URL is correct.
Admin > System Config > System Settings
General tab
Make sure the Program URL is correct.
If a DNS entry is used make sure that this resolves to your new IP address.
localhost Entry In /etc/hosts
It has been observed that sometimes the system-config-network or nmtui tool removes the localhost entries from the /etc/hosts file.
Edit your /etc/hosts file and make sure there are localhost entries. For example:
127.0.0.1    localhost.localdomain    localhost.localdomain    localhost4    localhost4.localdomain4    localhost    xi-c6x-x64
::1    localhost.localdomain    localhost.localdomain    localhost6    localhost6.localdomain6    localhost    xi-c6x-x64
Troubleshooting
After you change the IP address and reboot the server you find that the interface is in the DOWN state.
The following line needs changing in the config file:
ONBOOT=no
To:
ONBOOT=yes
Final Thoughts
For any support related questions please visit the Nagios Support Forums at:


