Overview
This KB article explains the different certificate warnings you may experience when implementing an SSL/TLS certificate on your Nagios product.
The following warnings are addressed in this KB article:
Certificate Authority Is Not Trusted
After implementing a certificate, when you navigate to the address you are presented with the following page:
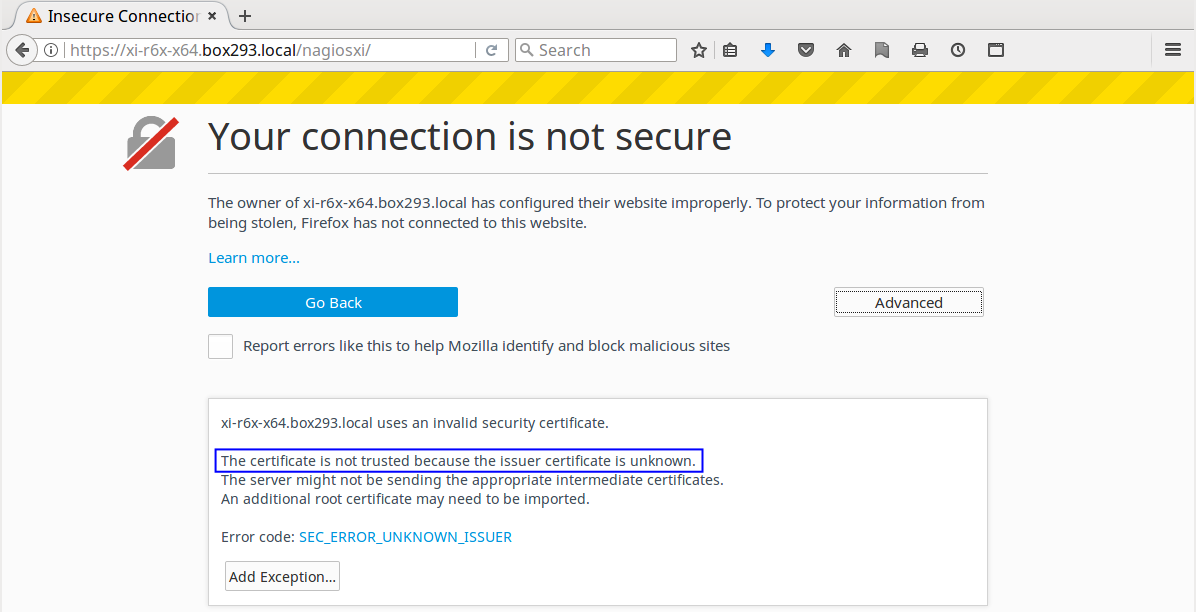
You will most commonly see this error message when using self signed certificates or you are using an internal Certificate Authority (CA) to sign and issue certificates.
When you generate a certificate, you create a request that needs to be signed by a Certificate Authority (CA). You provide this request to the CA and you will then receive the signed certificate.
When an end user points their web browser to the Nagios server, the Nagios server will present them with the signed certificate. The web browser will look at the certificate and see that it has been issued by the CA XYZ. The web browser will check it’s local database of trusted CA’s to make sure that this certificate can be trusted. As you can imagine, the web browser does not know about your XYZ CA and instantly tells you that you should not trust this certificate.
First and foremost, if your certificate was issued by a trusted CA (like VeriSign) then this warning should be investigated into immediately. Web browsers are kept up to date with publicly trusted CA’s and something must be wrong for you to be seeing this message.
However it’s most likely you are seeing this error message when using self signed certificates or you are using an internal CA to sign and issue certificates. There are two solutions available to this problem.
Add CA Certificate To Web Browser Trusted CA’s
If you are using an internal CA to sign and issue certificates then you should add that certificate to your web browsers trusted CA’s. This example will show you how to do this with Mozilla Firefox.
First you must obtain the CA certificate. This example is using a Microsoft CA to sign and issue certificates. The Microsoft CA has a web interface available that you can download the CA certificate from. This can be accessed by navigating to the following address in your web browser:
http://ca_server_address/certsrv
You will need to provide valid credentials to access the website.
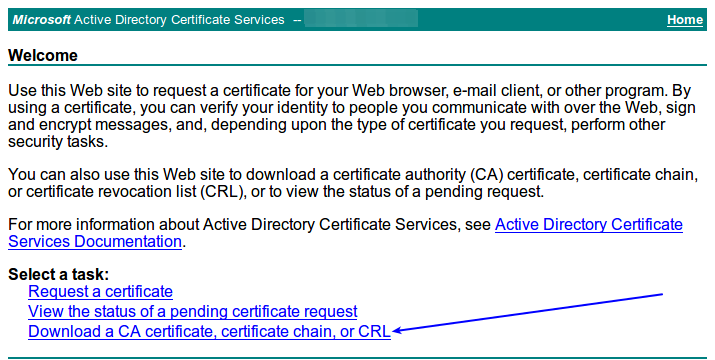
You will be presented with the Welcome page. Click the Download a CA certificate, certificate chain, or CRL link.
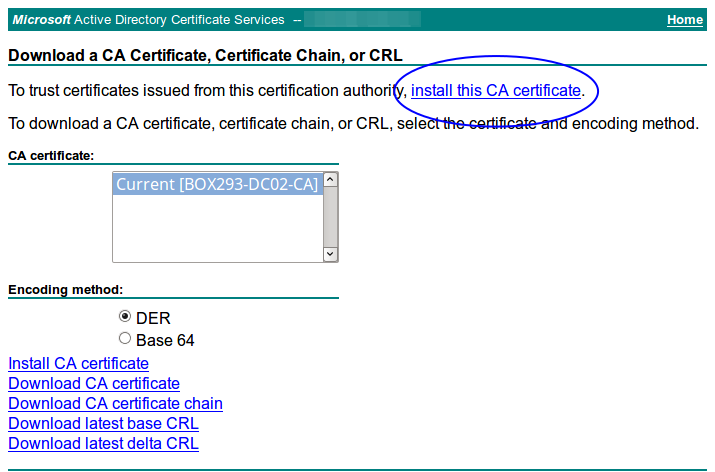
On the next page click the install this CA certificate link.
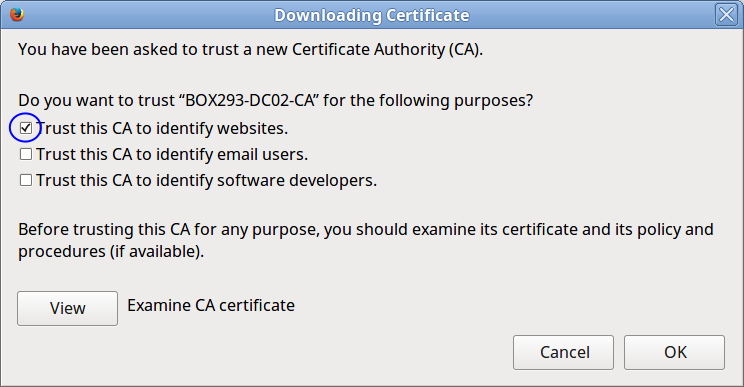
Firefox will detect that you are downloading a CA certificate and will ask if you want to trust it. Click the Trust this CA to identify website check box and then click OK.
The CA certificate will be installed. If you visit the Nagios product in your web browser again you will not receive the warning. You can click the padlock icon to display information about the certificate and confirm that it is secure.

The added benefit of installing the CA certificate means that if you implement certificates in other Nagios products that have been signed by this CA then they will immediately work.
If you are using a Microsoft CA, your computer is a member of that domain AND you are using (Internet Explorer / Edge) then you will not need to install the CA. Internet Explorer and Edge use the Windows computer’s local CA store. Because the computer is a member of the domain it already has a copy of the CA certificate in it’s trusted CA store. However other web browsers like Firefox use their own certificate store and this is why you need to install the CA certificate.
Add Exception To Web Browser (Firefox)
You can add an exception to your web browsers to ignore the warning. This example will show you how to do this with Mozilla Firefox. Click the Add Exception... button.

You will be prompted to add the exception. Make sure you click the Permanently store this exception check box and then click the Confirm Security Exception button.

The exception will be added and the page reloaded. While you will no longer receive the warning, the padlock icon will have a warning icon on it and when you click on it you will be told the connection is not secure.

Add Exception To Web Browser (Chrome)
You can add an exception to your web browsers to ignore the warning. This example will show you how to do this with Google Chrome. Click the Advanced button.
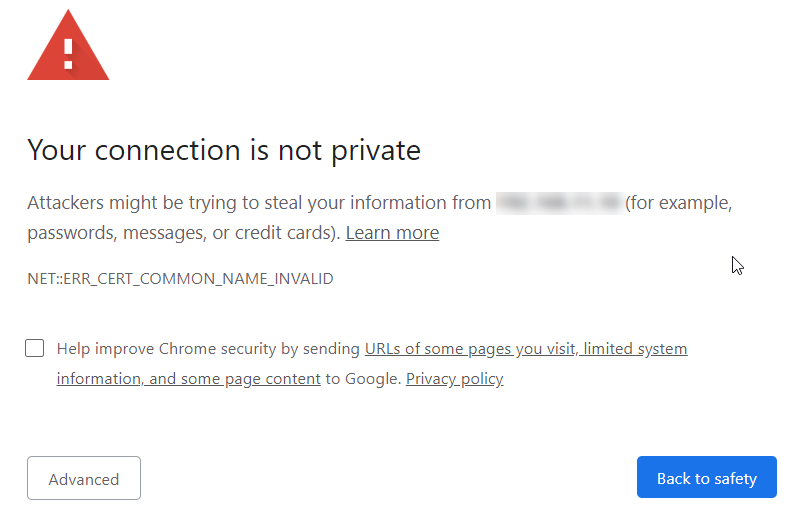
You will be prompted to proceed to the site. Make to click the Proceed to … link to add the exception.

The exception will be added and the page reloaded. While you will no longer receive the warning, the page will have a warning icon on it and when you click on it you will be told the connection is not secure.
URL Does Not Match Common Name
After implementing a certificate, when you navigate to the address you are presented with the following page:

If you click the Add Exception button you will be presented with a screen where you can click the View button.
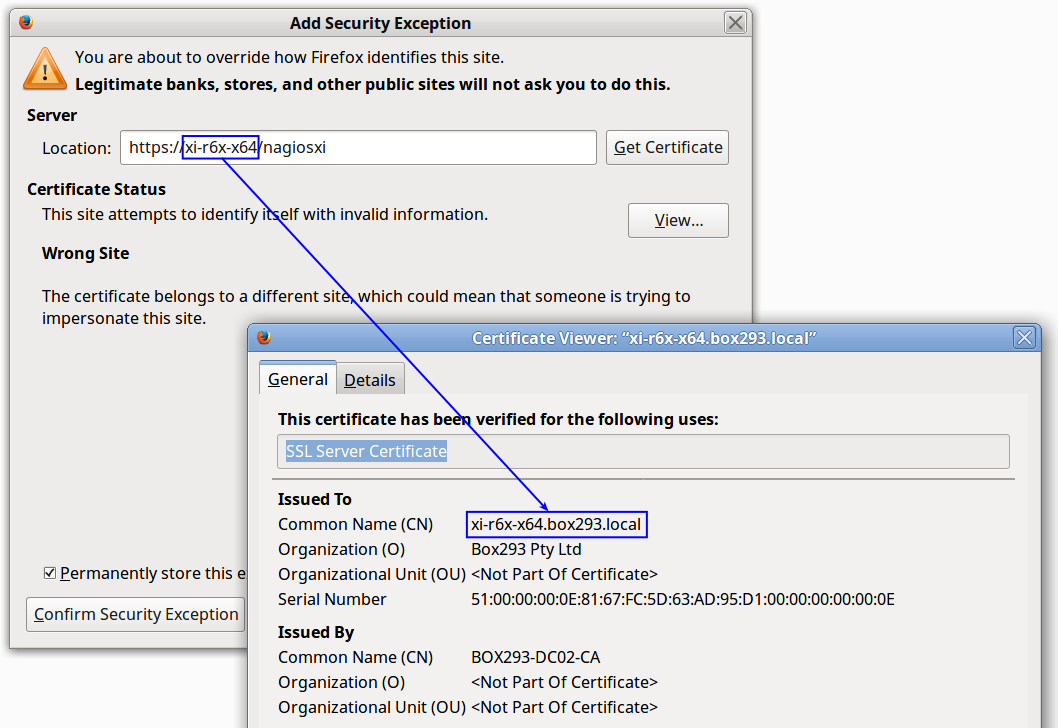
In the screenshot above you can see that the address that was typed into the web browser was xi-r6x-x64 however the certificate Common Name (CN) was created for xi-r6x-x64.box293.local . If you were to type https://xi-r6x-x64.box293.local/nagiosxi into the address bar then the certificate would work correctly and you would not receive any warnings.
You can create an Apache rewrite rule on your Nagios server to redirect the web browser to xi-r6x-x64.box293.local and this would resolve the problem. This is defined in the /etc/httpd/conf/httpd.conf file, execute the following command to open the file in vi:
vi /etc/httpd/conf/httpd.conf
When using the vi editor, to make changes press i on the keyboard first to enter insert mode. Press Esc to exit insert mode.
Change this line:
RewriteRule (.*) https://%{HTTP_HOST}%{REQUEST_URI}
To this:
RewriteRule (.*) https://xi-r6x-x64.box293.local%{REQUEST_URI}
When you have finished, save the changes in vi by typing:
:wq
and press Enter .
The last step is to restart the Apache service using one of the commands below:
RHEL 7+| CentOS 7+ | Oracle Linux 7+
systemctl restart httpd.service
Debian | Ubuntu 16/18+
systemctl restart apache2.service
Now it doesn’t matter if the user types the wrong address in their address bar, Apache will direct them to the correct address and will not receive the certificate warning.
Final Thoughts
For any support related questions please visit the Nagios Support Forums at:


