;)

;)
;)

;)
;)
;)

;)
;)
;)
;)
;)
;)
;)
;)

;)
;)
;)
;)
;)
;)
;)
;)
;)
;)
;)
;)
;)
;)
;)
;)
;)
;)
;)
;)
;)
;)
;)
;)
;)
;)
;)

Overview
The purpose of this article is to document how to setup MATCH statements in the SNMP Trap interface.
By default, when a Trap is setup in Nagios XI, all traps for that entry are received as an OK status, so no matter what is received the status in the check in Nagios will always show an OK status, even though a trap with a bad status was received.
The MATCH statement gives the ability to show OK, Warning, and Critical status in Nagios depending on the trap data that was received from the device that is sending Traps to the Nagios XI server.
Example
For this document, we are going to use the Example Trap Definition.
- To add it, login to the Nagios XI interface and go to the Admin > SNMP Trap Interface menu and click on the Advanced Tab.
- Click the button called Add Example Trap Definition to add the example.
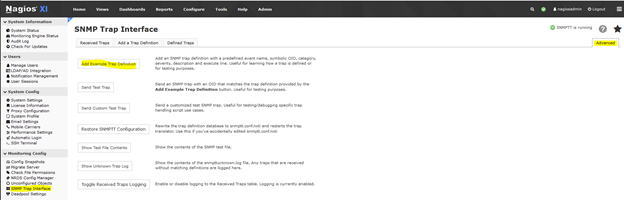
- Click on the Defined Traps Tab and use the following to search for the Example TRAP: netSnmpExampleHeartbeatNotification

- To view the Trap Definition, click on the Edit icon on the right. (The Pencil icon). Here you will see the default entry.
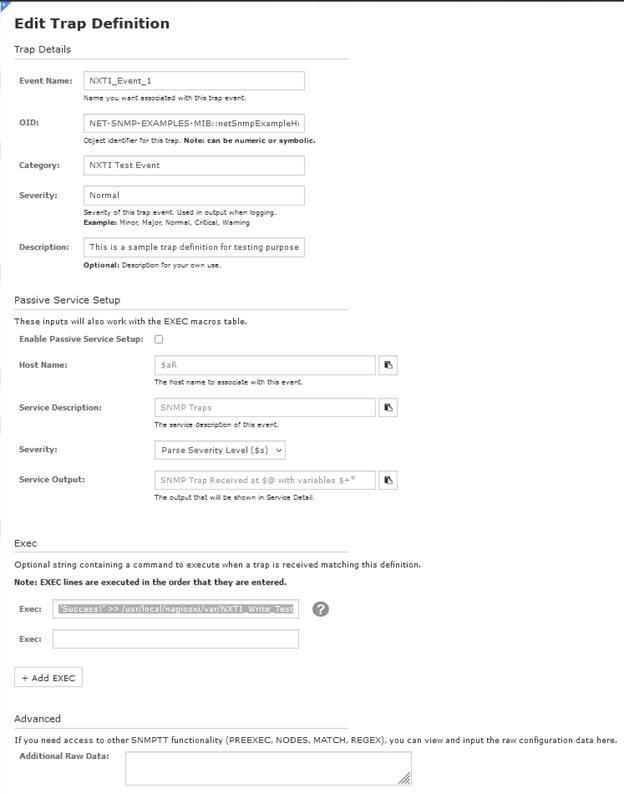
- To use this Trap, some Modifications will have to be done. We will be settings this trap for the OK status Trap.
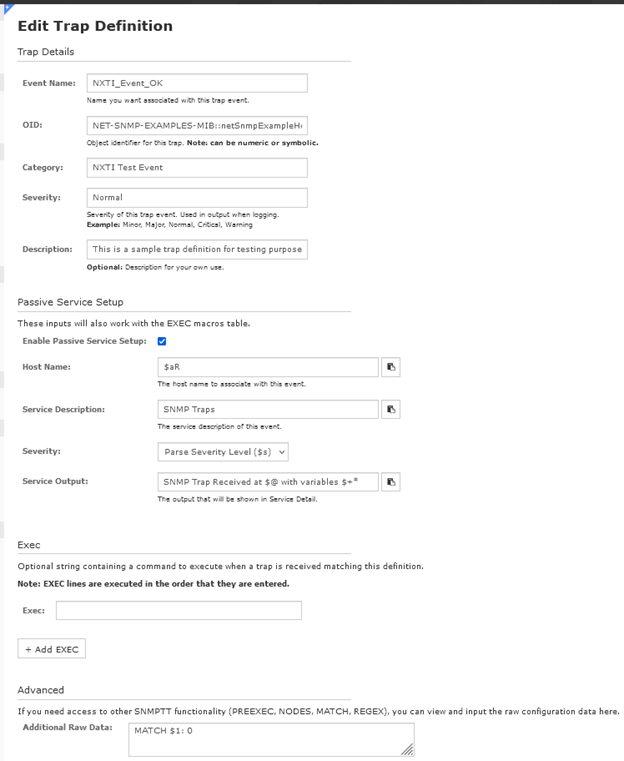
- Change the Event Name to NXTI_Event_OK.
- Then enable the Enable Passive Service Setup by checking the box.
- Put $aR in the Host Name field.
- Put SNMP Traps in the Service Description field.
- In the Service Output field, enter in the following: SNMP Trap Received at $@ with variables $+*
- From the first Exec Line, remove the following so it is blank: echo 'Success!' >> /usr/local/nagiosxi/var/NXTI_Write_Test
- In the Additional Raw Data field, put in the following MATCH statement: MATCH $1: 0
- Click the Submit button to save.
See this link for more details on the MATCH statement.
Testing the Match Statement
The MATCH example used above will send an OK status to Nagios if that example trap is received on the server with the first field set to a 0 as an integer.
To test this out, you can run the following command from a root shell on the Nagios server.
/usr/bin/snmptrap -v 2c -c public 127.0.0.1 '' NET-SNMP-EXAMPLES-MIB::netSnmpExampleHeartbeatNotification netSnmpExampleHeartbeatRate i 0
The first time a trap is received, it has to be configured in the Admin > Unconfigured Objects menu. After that, it will be received automatically and show up in the SNMP Traps service.
Configure the trap from the Admin > Unconfigured Objects menu to create the Host / Service Check in the XI interface for that trap.
If you have to configure it, do so to create a Service Check called SNMP Traps for the host called 127.0.0.1.
Send the trap again to set the status in the check.
/usr/bin/snmptrap -v 2c -c public 127.0.0.1 '' NET-SNMP-EXAMPLES-MIB::netSnmpExampleHeartbeatNotification netSnmpExampleHeartbeatRate i 0
In XI, go to the Home > Service Status menu and search for the SNMP Traps service for the host called 127.0.0.1 and you should see the service set to an OK status.
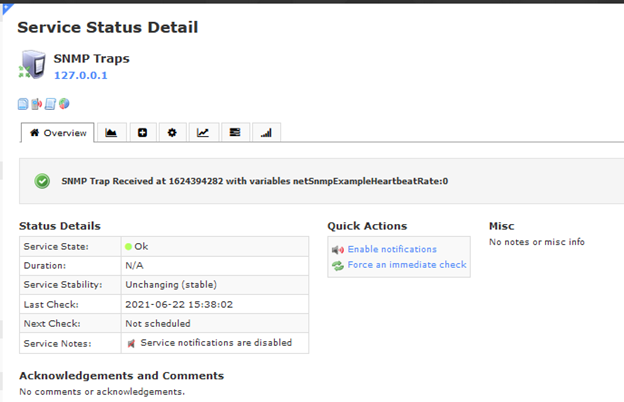
Every time a trap is received and the netSnmpExampleHeartbeatRate in the example command is set to a 0, it will update the Last Check time: in the service check.
Try it out and see the time change.
To test the Trap to see if it will ignore a received Trap that is not set to a 0 and it does not update the status, run the following.
/usr/bin/snmptrap -v 2c -c public 127.0.0.1 '' NET-SNMP-EXAMPLES-MIB::netSnmpExampleHeartbeatNotification netSnmpExampleHeartbeatRate i 1
Notice how the Last Check: time did not update. That is a good thing as the trap is set to only update Nagios when a 0 is received for the netSnmpExampleHeartbeatRate OID.
Adding Warning and Critical Trap Definitions
Now we will be adding the Warning and Critical trap definitions in the SNMP Trap Interface. We will be using the OK Trap as a template to create them with some changes.
- Go to the SNMP Trap Interface menu and click on the Add a Trap Definition Tab to add a trap. Most of the fields will be the same as the OK trap with the following changes.
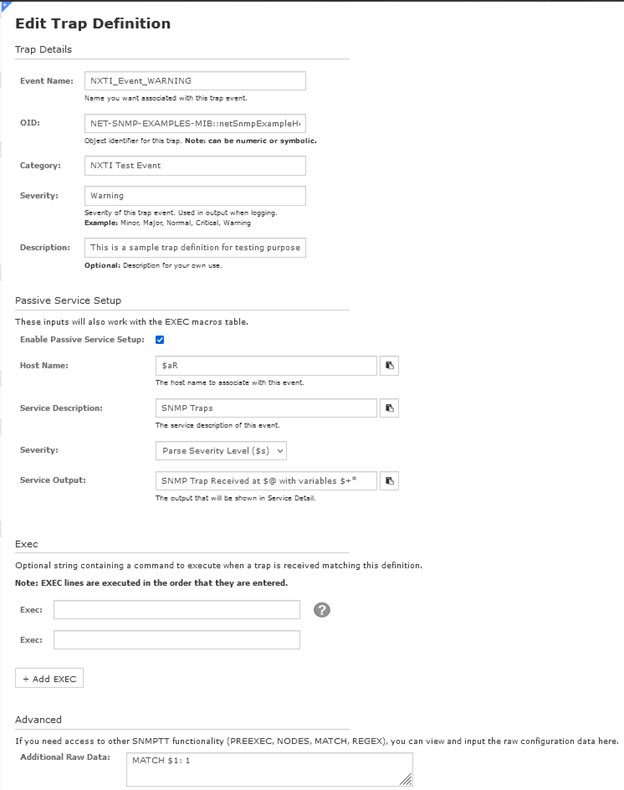
- Use the following for the Event Name NXTI_Event_WARNING
- In the Severity field, use the following: Warning
- In the Additional Raw Data field, use the following: MATCH $1: 1
- Submit the change.
- For the Critical Trap, add another Trap definition to the system but with the following changes.
- Use the following for the Event Name: NXTI_Event_CRITICAL
- In the Severity field, use the following: Critical
- In the Additional Raw Data field, use the following: MATCH $1: 2
- Submit the change.

Testing the New Traps
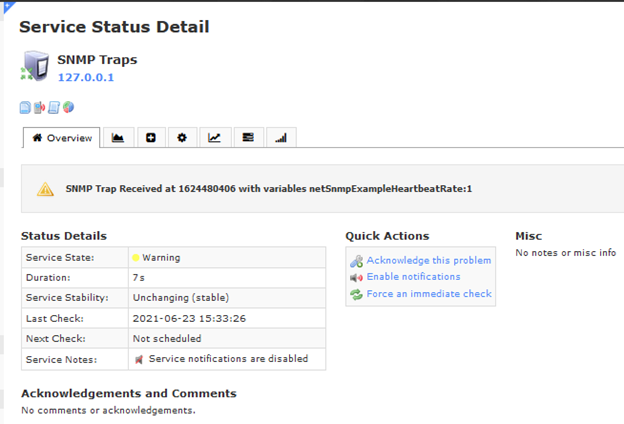
To test out the new Traps, in XI, go to the Home > Service Status menu and search for the SNMP Traps service for the host called 127.0.0.1.
If should still be showing an OK status.
Next run this in a root shell to set the status to Warning.
/usr/bin/snmptrap -v 2c -c public 127.0.0.1 '' NET-SNMP-EXAMPLES-MIB::netSnmpExampleHeartbeatNotification netSnmpExampleHeartbeatRate i 1
Check the Status of the SNMP Traps service and it should show a Warning status.
To test the Critical Trap, run this in the root shell.
/usr/bin/snmptrap -v 2c -c public 127.0.0.1 '' NET-SNMP-EXAMPLES-MIB::netSnmpExampleHeartbeatNotification netSnmpExampleHeartbeatRate i 2
Check the Status of the SNMP Traps service and it should show a Critical status.

To put the Status back to OK, run this.
/usr/bin/snmptrap -v 2c -c public 127.0.0.1 '' NET-SNMP-EXAMPLES-MIB::netSnmpExampleHeartbeatNotification netSnmpExampleHeartbeatRate i 0
If you see the changes, then the Traps are setup correctly.
Adding Using the Command Line
Another option is you can add the Traps to XI using the command line.
These can be imported into NXTI using a script which can save time creating them in the Web Interface and also it allows for many traps to be added to the system at once.
First, you will need to get an example Trap to modify and we will be looking at the OK trap for that.
The text Trap definitions are in the /etc/snmp/snmptt.conf.nxti file so open it up with an editor and search for this string.
NXTI_Event_OK
You should see the following trap definition.
EVENT NXTI_Event_OK NET-SNMP-EXAMPLES-MIB::netSnmpExampleHeartbeatNotification "NXTI Test Event" Normal
FORMAT Received trap "$N" with variables "$+*"
EXEC php /usr/local/nagiosxi/scripts/nxti.php --event_name="$N" --event_oid="$i" --numeric_oid="$o" --symbolic_oid="$O" --community="$C" --trap_hostname="$R" --trap_ip="$aR" --agent_hostname="$A" --agent_ip="$aA" --severity="$s" --uptime="$T" --datetime="$x $X" --unixtime="$@" --category="$c" --bindings="$+*"
EXEC /usr/local/bin/snmptraphandling.py "$aR" "SNMP Traps" "$s" "$@" "" "SNMP Trap Received at $@ with variables $+*"
MATCH $1: 0
SDESC
This is a sample trap definition for testing purposes
EDESC
Copy that data to a text editor so we can modify it to create the Warning and Critical Traps which are the examples below.
EVENT NXTI_Event_WARNING NET-SNMP-EXAMPLES-MIB::netSnmpExampleHeartbeatNotification "NXTI Test Event" Warning
FORMAT Received trap "$N" with variables "$+*"
EXEC php /usr/local/nagiosxi/scripts/nxti.php --event_name="$N" --event_oid="$i" --numeric_oid="$o" --symbolic_oid="$O" --community="$C" --trap_hostname="$R" --trap_ip="$aR" --agent_hostname="$A" --agent_ip="$aA" --severity="$s" --uptime="$T" --datetime="$x $X" --unixtime="$@" --category="$c" --bindings="$+*"
EXEC /usr/local/bin/snmptraphandling.py "$aR" "SNMP Traps" "$s" "$@" "" "SNMP Trap Received at $@ with variables $+*"
MATCH $1: 1
SDESC
This is a sample trap definition for testing purposes
EDESC
EVENT NXTI_Event_CRITICAL NET-SNMP-EXAMPLES-MIB::netSnmpExampleHeartbeatNotification "NXTI Test Event" Critical
FORMAT Received trap "$N" with variables "$+*"
EXEC php /usr/local/nagiosxi/scripts/nxti.php --event_name="$N" --event_oid="$i" --numeric_oid="$o" --symbolic_oid="$O" --community="$C" --trap_hostname="$R" --trap_ip="$aR" --agent_hostname="$A" --agent_ip="$aA" --severity="$s" --uptime="$T" --datetime="$x $X" --unixtime="$@" --category="$c" --bindings="$+*"
EXEC /usr/local/bin/snmptraphandling.py "$aR" "SNMP Traps" "$s" "$@" "" "SNMP Trap Received at $@ with variables $+*"
MATCH $1: 2
SDESC
This is a sample trap definition for testing purposes
EDESC
You will see the changes on the EVENT line and the change to the MATCH statement.
Create a file on the Nagios server with an editor. I called the file nxti for example and put in the example Warning and Critical traps and save the file.
Now execute the following command to import the traps:
/usr/local/nagiosxi/scripts/nxti_import.php nxti
The script will output one line per trap it imports, here is the output for the example Traps.
NXTI_Event_WARNING
NXTI_Event_CRITICAL
You can close the terminal session as you have completed this part of the import.
Validating Import
Next, you need to open SNMP Trap Interface menu and check to make sure the traps have been imported.
- In XI, navigate to the Defined Traps tab in the SNMP Trap Interface page.
- Search for NXTI_Event_WARNING or NXTI_Event_CRITICAL and you will see them in the Web Interface.
- The final step is to force the NXTI defined traps into the snmptt.conf.nxti file and restart the snmptt service.
- Both of these steps are performed by navigating to the Advanced tab and clicking the Restore SNMPTT Configuration button.
After completing these steps you will have successfully imported the traps in the nxti file into the SNMP Trap Interface.
More Information
Here are some details about the Example Trap definition.
The MIB file that holds the Example Trap is the following file on the Nagios server.
/usr/share/snmp/mibs/NET-SNMP-EXAMPLES-MIB.txt
To view the Trap configuration in the file, it has to be converted to a format the snmptt daemon needs to process inbound traps and forward them to Nagios.
The command is called snmpttconvertmib and if you run the following command, it should create a file called /root/example on the server.
snmpttconvertmib --in="/usr/share/snmp/mibs/NET-SNMP-EXAMPLES-MIB.txt" --exec '/usr/local/bin/snmptraphandling.py "$aR" "SNMP Traps" "$s" "$@" "$-*"' --out=/root/example
If you look in the example file, you will see the following.
#
#
#
#
MIB: NET-SNMP-EXAMPLES-MIB (file:/usr/share/snmp/mibs/NET-SNMP-EXAMPLES-MIB.txt) converted on Thu Jun 24 16:26:49 2021 using snmpttconvertmib v1.3
#
#
#
EVENT netSnmpExampleHeartbeatNotification .1.3.6.1.4.1.8072.2.3.0.1 "Status Events" Normal
FORMAT An example notification, used to illustrate the $*
EXEC /usr/local/bin/snmptraphandling.py "$aR" "SNMP Traps" "$s" "$@" "$-*" "An example notification, used to illustrate the $*"
SDESC
An example notification, used to illustrate the
definition and generation of trap and inform PDUs
(including the use of both standard and additional
varbinds in the notification payload).
This notification will typically be sent every
30 seconds, using the code found in the example module
agent/mibgroup/examples/notification.c
Variables:
1: netSnmpExampleHeartbeatRate
EDESC
One thing to look at is the Variables: section.
It has the variable called netSnmpExampleHeartbeatRate which is what was used in the snmptrap commands to generate the traps in Nagios.
To find out what that variable is and does, open the /usr/share/snmp/mibs/NET-SNMP-EXAMPLES-MIB.txt MIB file and search for netSnmpExampleHeartbeatRate and you will see a description of what that OID is for.
netSnmpExampleHeartbeatRate OBJECT-TYPE
SYNTAX Integer32
MAX-ACCESS accessible-for-notify
STATUS current
DESCRIPTION
"A simple integer object, to act as a payload for the
netSnmpExampleHeartbeatNotification. The value has
no real meaning, but is nominally the interval (in
seconds) between successive heartbeat notifications."
::= { netSnmpExampleNotificationObjects 1 }
It states that the OID is an integer which is why the 0, 1, 2 was used in the snmptrap command.
This specific part of the command.
netSnmpExampleHeartbeatRate i 0
The letter i says to use an integer for the OID and the above example uses a 0 for the data.
Depending on what trap your devices uses, the OID type may not be an integer and the following link has details on what could be used.
https://linux.die.net/man/1/snmptrap
For example, if your device sends a string as the data, the snmptrap command would use the letter s to designate a string.
TheOIDFromTheDevice s thestringdata
Using the snmpttconvertmib command and searching the MIB file is important. It has to be done to determine what the device sends as the Trap and that effects what is used for the MATCH statement.
For example, if the device sends the string OK, or WARNING, or CRITICAL as the data, the MATCH statements need to look like this.
MATCH $1: (OK)
MATCH $1: (WARNING)
MATCH $1: (CRITICAL)
The () in the MATCH is a regex for the string data and if the string contains what is in between the (), then the Trap will match.
See the below link for details on what can be used for the MATCH statement and some examples.
http://snmptt.sourceforge.net/docs/snmptt.shtml#SNMPTT.CONF-MATCH


